


The Data Creator
Don't worry, it's there! There's just no data; this is a fresh site collection. The final aspect of a deployment that DDD considers is data creation. At the beginning of the book, we asked the question of whether this is the responsibility of the structure provisioning logic or a data creator. Well, there's no right answer. In general, my thought is that if it's a page or a list item required to make the site functional (landing pages, items in a configuration list, etc.) then they should probably be deployed and considered a part of the information architecture.
But if we're talking about straight up content, I'd argue for the data creator. Put simply: if deleting it doesn't break the site, or cause an error in any way, it's data, not structure. However, technically, we can of course do whatever we want. So I'm going to consider everything in our DDD site here, other than the home page, to be "data" and therefore provisioned by our data creator. We'll be using it to create categories and article pages with lookup values to them.
The first question is, what does this guy look like? Let's construct it now. In our Visual Studio solution, add a new SharePoint project called "DDD.DataCreator." (Don't forget to update your Configuration Manager!) We'll use this project to house a bunch of PowerShell commandlets that will do the dirty work for us. Why commandlets? Because I'm not a fan of copy-and-pasting the executable files of a Windows Forms or console app to a server and running their code there. I also don't want to be limited by the client object models.
Commandlets bake directly into PowerShell, and are installed farm wide, so we can use the commands anywhere. Not only is it cleaner, but it's also the thinnest membrane between PowerShell skin and .NET bones. With a small (nearly copy-and-pastable) blob of XML and a class that inherits from a derivation of "Microsoft.SharePoint.PowerShell.SPCmdlet" we can achieve a fully deployable way to execute SharePoint code without any manual file copies or UIs.
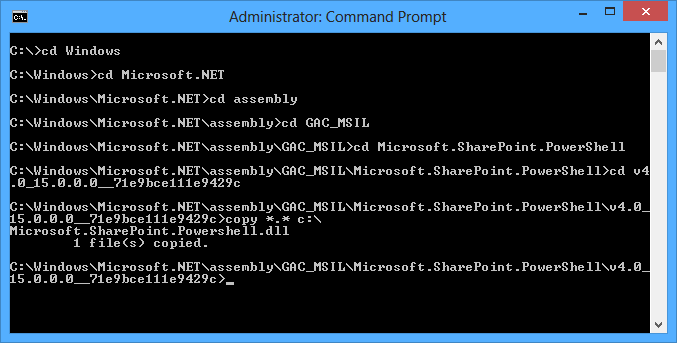
First, add "Microsoft.SharePoint.PowerShell.dll" to Dependencies (as an existing item) and to DataCreator (as a reference from Dependencies). We'll have to pull it out of the GAC (on Windows Server 2012) from here:
C:\Windows\Microsoft.NET\assembly\GAC_MSIL\Microsoft.SharePoint.PowerShell\
v4.0_15.0.0.0__71e9bce111e9429c\Microsoft.SharePoint.PowerShell.dll
If you're not on the latest version of Windows Server, open a Command prompt, navigate to this location in the GAC, (exclude "Microsoft.NET" from the above path) and copy the file to a more manageable location. You have to do this oldskool: when you get inside the final folder, do a "copy *.* c:\" to get the DLL out to the root. Then fast-forward twenty years and use Windows to get the DLL into DDD.Dependencies.
We'll also need add the following references:
- DDD.Data (Add this reference to "Additional Assemblies" in the package designer as well.)
- System.Web
- DDD.Common (Add this reference to "Additional Assemblies" in the package designer as well.)
- Microsoft.SharePoint
- Microsoft.SharePoint.Publishing
- System.Management.Automation
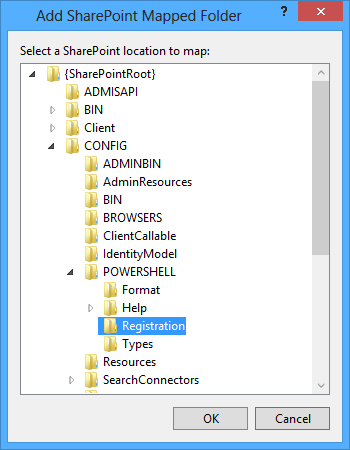
Next, we need to wire up a folder so that our WSP deploys the commandlet to where they need to go on the front end servers. SharePoint PowerShell registration is actually quite easy: just like .webpart files in the Web Part Gallery, you simply dump a blob of XML (which we'll see in a bit) into 15\CONFIG\POWERSHELL\Registration. So right click DDD.DataCreator, and do an "ADD | SharePoint Mapped Folder..." to this location.
Now, just like "Layouts" in DDD.Web, everything under this folder will be pushed to where it needs to go on the file systems of all web front ends upon WSP deployment. That's it! Opening SharePoint Management Shell will load all the XML files from this location. All these guys do is point to a DLL and a class that implements a commandlet, and provides some metadata around the verb and command used to invoke it.
Updates to your commandlets are also super easy to push out. Just right-click-deploy the project, and make sure to close and re-open the SharePoint Management Shell so that the new bits get sucked in. Like I said, this is the fastest way to execute repeatable .NET logic against your SharePoint farm, beyond timer jobs, feature receivers, or stand-alone custom apps.
Add two new items under "Registration" – an XML file (NewPage.xml) and a class (NewPage.cs). These two files are the definition and implementation of our commandlet. Let's look at the markup first. It's the same for all commandlets; all you have to update is the class to which it points, and the verb name. Everything else is either common or tokenized. Here's what it looks like.
Code Listing 65: NewPage.xml
- <?xml version="1.0" encoding="utf-8" ?>
- <ps:Config xmlns:ps="urn:Microsoft.SharePoint.PowerShell" xmlns:xsi="http://www.w3.org/2001/XMLSchema-instance" xsi:schemaLocation="urn:Microsoft.SharePoint.PowerShell SPCmdletSchema.xsd">
- <ps:Assembly Name="$SharePoint.Project.AssemblyFullName$">
- <ps:Cmdlet>
- <ps:VerbName>New-Page</ps:VerbName>
- <ps:ClassName>DDD.DataCreator.NewPage</ps:ClassName>
- <ps:HelpFile>$SharePoint.Project.AssemblyFileName$-help.xml</ps:HelpFile>
- </ps:Cmdlet>
- </ps:Assembly>
- </ps:Config>
As we add more and more commandlets, feel free to copy-and-paste this markup blob around. All we have to change are Line #'s 5 and 6! Next, let's look at the code. The pattern I'm following is to inherit from SP[Verb]CmdletBase<T> (in DataCreator, [Verb] will of course be "New"). All the logic is in an override of "CreateDataObject." The parameters are simply .NET properties decorated with the "Parameter" attribute. This will all make sense when we look at the code.
Let's start with updates to our SPMetal in DDD.Data. We already have our article pages context (RollupEntitiesDataContext); now we need one for categories. It has to be separate because they are stored in different SPWebs. I'll go through this faster than we did in the SPMetal section so we can focus on the commandlets. The following code listings are all in corresponding new files in DDD.Data. First, the parameters:
Code Listing 66: Category.xml
- <?xml version="1.0" encoding="utf-8" ?>
- <Web xmlns="http://schemas.microsoft.com/SharePoint/2009/spmetal">
- <List Name="Category Lookup" Member="CategoryLookup">
- <ContentType Name="Category" Class="Category" />
- </List>
- <ExcludeOtherLists />
- <ContentType Name="Rollup Category" Class="RollupCategory" />
- <ExcludeOtherContentTypes />
- </Web>
Next, update the project's Pre-Build to the following:
cd..
cd\Program Files\Common Files\microsoft shared\Web Server Extensions\15\BIN
REM spmetal.exe /web:http://$(SolutionName).local/category/rollup
/namespace:$(ProjectName) /code:"$(ProjectDir)RollupEntities.cs"
/parameters:"$(ProjectDir)Rollup.xml"
spmetal.exe /web:http://$(SolutionName).local
/namespace:$(ProjectName).Categories
/code:"$(ProjectDir)CategoryEntities.cs"
/parameters:"$(ProjectDir)Category.xml"
Notice in the bolded text that I'm REM-ing out the previous "spmetal.exe" call and adding a new one, slightly modified to talk to the root web (where the categories live). With this mechanism, we can quickly switch back and forth between the two different contexts. Save the file, rebuild, and add the newly-generated "CategoryEntities.cs" file to the project. Next we extend our context with a partial class to optimize for read-only operations:
Code Listing 67: CategoryEntitiesDataContext.cs
- using System;
- using Microsoft.SharePoint;
- namespace DDD.Data.Categories
- {
- public partial class CategoryEntitiesDataContext
- {
- #region Initialization
- public CategoryEntitiesDataContext() : this(SPContext.Current.Web.Url)
- {
- //use this default constructor for READS...explicitly set context.ObjectTrackingEnabled to true for UPDATES
- }
- #endregion
- #region Events
- partial void OnCreated()
- {
- //by default we turn OFF object tracking for performance
- this.ObjectTrackingEnabled = false;
- }
- #endregion
- }
- }
Really the only notable difference between this code listing and the one for rollup articles is the namespace. In Linq-To-SharePoint, every context will generate base classes, such as "Item." If you have multiple contexts with the same namespaces, these will obviously collide. So in the above code, as well as the new spmetal.exe command, we're specifying the "DDD.Data.Categories" namespace. This brings our data layer up to speed. Let's get back into the DataCreator project.
First, add a class called "BaseResult" from which all of our "T" return types will inherit. These are just POCOs that PowerShell will list after the commandlet executes. I like to refactor these into a base class, since most will look the same; they all have an Id, a Title, and an Error string which, if it's null or not, indicates if the operation was successful. Here's what it looks like:
Code Listing 68: BaseResult.cs
- using System;
- namespace DDD.DataCreator
- {
- public class BaseResult
- {
- #region Properties
- public Guid Id { get; set; }
- public string Title { get; set; }
- public string Error { get; set; }
- #endregion
- }
- }
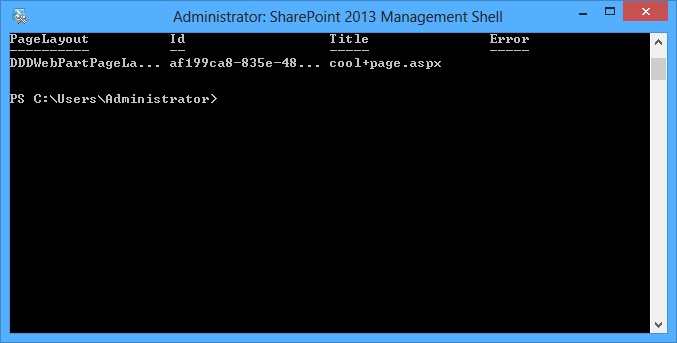
The derived class, NewPageResult, adds a "PageLayout" property. This class is in NewPage.cs, which we'll be adding next.
Code Listing 69: NewPage.cs
- public class NewPageResult : BaseResult
- {
- #region Properties
- public string PageLayout { get; set; }
- #endregion
- }
Here's how these properties look after a successful execution:
Now we're ready to look at the commandlet. Add a new class to DDD.DataCreator under the "Registration" folder called "NewPage.cs."
Code Listing 70: NewPage.cs
- [Cmdlet(VerbsCommon.New, "Page")]
- [SPCmdlet(RequireLocalFarmExist = true, RequireUserFarmAdmin = true)]
- public class NewPage : SPNewCmdletBase<NewPageResult>
- {
- #region Properties
- [ValidateNotNullOrEmpty()]
- [Parameter(Position = 0, Mandatory = true)]
- public string Url { get; set; }
- [ValidateNotNullOrEmpty()]
- [Parameter(Position = 1, Mandatory = true)]
- public string Title { get; set; }
- [ValidateNotNullOrEmpty()]
- [Parameter(Position = 2, Mandatory = true)]
- public string PageLayout { get; set; }
- [ValidateNotNullOrEmpty()]
- [Parameter(Position = 3, Mandatory = true)]
- public string Category { get; set; }
- #endregion
- #region Events
- protected override NewPageResult CreateDataObject()
- {
- //initialization
- this.Host.UI.WriteLine(ConsoleColor.Magenta, ConsoleColor.Black, string.Format("Creating {0} based off of {1} in {2}...", this.Title, this.PageLayout, this.Url));
- //open site
- using (SPSite site = new SPSite(this.Url))
- {
- //get publishing web
- using (SPWeb root = site.RootWeb)
- {
- //ensure publishing site
- if (!PublishingWeb.IsPublishingWeb(root))
- {
- //not a publishing site
- string error = string.Concat(root.Name, " is not a publishing site.");
- this.Host.UI.WriteErrorLine(error);
- //return
- return new NewPageResult()
- {
- //build result
- Error = error,
- Title = this.Title,
- Category = this.Category
- };
- }
- //fix page layout
- if (!this.PageLayout.EndsWith(".aspx", StringComparison.InvariantCultureIgnoreCase))
- this.PageLayout = string.Concat(this.PageLayout, ".aspx");
- //get page layout
- PublishingWeb pub = PublishingWeb.GetPublishingWeb(root);
- PageLayout layout = pub.GetAvailablePageLayouts().SingleOrDefault(pl => pl.Name.Equals(this.PageLayout));
- if (layout == null)
- {
- //page layout not found
- string error = string.Format("The page layout {0} was not found.", this.PageLayout);
- this.Host.UI.WriteErrorLine(error);
- //return
- return new NewPageResult()
- {
- //build result
- Error = error,
- Title = this.Title,
- Category = this.Category
- };
- }
- //open web
- using (SPWeb web = site.OpenWeb())
- {
- //get spmetal context
- CAT.CategoryEntitiesDataContext context = new CAT.CategoryEntitiesDataContext(site.RootWeb.Url);
- CAT.RollupCategory cat = context.CategoryLookup.SingleOrDefault(x => x.Title.Equals(this.Category, StringComparison.InvariantCultureIgnoreCase));
- //get category lookup
- if (cat == null)
- {
- //category list not found
- string error = string.Format("The {0} category was not found.", this.Category);
- this.Host.UI.WriteErrorLine(error);
- //return
- return new NewPageResult()
- {
- //build result
- Error = error,
- Title = this.Title,
- Category = this.Category
- };
- }
- //create page
- PublishingPage page = web.CreatePage(layout.ListItem, string.Concat(HttpUtility.UrlEncode(this.Title), ".aspx"), this.Title, false);
- page.CheckOut();
- //set category
- SPFieldLookupValueCollection value = new SPFieldLookupValueCollection();
- value.Add(new SPFieldLookupValue(cat.Id.Value, cat.Title));
- page.ListItem[Constants.SiteColumns.CategoryLookup.Id] = value;
- page.ListItem.Update();
- page.ListItem.File.CheckInPublishApprove();
- //return
- this.Host.UI.WriteLine(ConsoleColor.Green, ConsoleColor.Black, string.Format("Successfully created {0} at {1} on {2}.", this.Title, this.Url, DateTime.Now.ToLongTimeString()));
- return new NewPageResult()
- {
- //build result
- Title = page.Name,
- Category = this.Category,
- Id = page.ListItem.UniqueId,
- PageLayout = this.PageLayout
- };
- }
- }
- }
- }
- #endregion
- }
This logic is mostly straight forward publishing provisioning code: get a publishing web, get a page layout, and create a page. The only things to point out are the bits that make this a commandlet and not, let's say, a Structure feature. The first ones are the properties in Line #'s 6-17. The decorations on them tell PowerShell their positions and requiredness. The "ValidateNotNullOrEmpty" attribute makes it so we don't have to check this ourselves; PowerShell will prompt the user for a value. Win.
Next, look at Line #'s 23, 35, 55, 76, and 96. What is written to the console via the Host.UI property does not participate in the PowerShell "pipelined" output; it's for informational purposes only. The admin running this script isn't frantically trying to read all the green and gray text on the screen; they are probably just looking for red ink. It's the objects returned from the overridden SP[Verb]CmdletBase<T> methods in your commandlets that PowerShell keeps track of and returns in the grid/listing view after executing a command.
Finally, starting at Line #88, we create our page. Using our new SPMetal objects, we get a reference to the category specified by the corresponding parameter. After creating the page on Line #112, we assemble a lookup value to the category and assign it to the list item. Make sure to check out (Line #88) and check in (Line #94) the correct objects when updating a page.
Next, let's add a commandlet that creates our category lookup list items. Start by copy-and-pasting NewPage.xml and NewPage.cs and renaming their clones to NewCategory.xml and NewCategory.cs. Fix the class name, update the second parameter in the "Cmdlet" attribute on the class, change the generic return type in the base class to "BaseResult," and remove the nested "NewPageResult" class in NewCategory.cs. Update the new XML file to reference the new class. I'll omit the XML blob, but show NewCategory.cs:
Code Listing 71: NewCategory.cs
- [Cmdlet(VerbsCommon.New, "Category")]
- [SPCmdlet(RequireLocalFarmExist = true, RequireUserFarmAdmin = true)]
- public class NewCategory : SPNewCmdletBase<BaseResult>
- {
- #region Properties
- [ValidateNotNullOrEmpty()]
- [Parameter(Position = 0, Mandatory = true)]
- public string Url { get; set; }
- [ValidateNotNullOrEmpty()]
- [Parameter(Position = 1, Mandatory = true)]
- public string Category { get; set; }
- #endregion
- #region Events
- protected override BaseResult CreateDataObject()
- {
- //initialization
- this.Host.UI.WriteLine(ConsoleColor.Magenta, ConsoleColor.Black, string.Format("Creating the {0} category...", this.Category));
- //get spmetal context
- CategoryEntitiesDataContext context = new CategoryEntitiesDataContext(this.Url);
- context.ObjectTrackingEnabled = true;
- //create category
- context.CategoryLookup.InsertAllOnSubmit(new List<RollupCategory>()
- {
- //create object
- new RollupCategory()
- {
- //assemble object
- Title = this.Category
- }
- });
- //save
- context.SubmitChanges();
- this.Host.UI.WriteLine(ConsoleColor.Green, ConsoleColor.Black, string.Format("Successfully created the {0} category at {1}", this.Category, DateTime.Now.ToLongTimeString()));
- //return
- return new BaseResult()
- {
- //build result
- Title = this.Category
- };
- }
- #endregion
- }
This commandlet very closely mirrors the one for articles. The one thing to point out is the use of SPMetal to create the list items. You'll almost always use Linq-to-SharePoint to query your site, but I thought it was important to show its update capabilities as well. In Line #20, we override my SPMetal optimization; updates don't work if object tracking is turned off.
Now that we have our commandlets built, we need to wrap them into a master data creator script that feeds in their values. This will be more like our other PowerShell deployment scripts. To start, let's add a new ps1 file to DDD.Common\Deployment named "DataCreator.ps1." You can either have one massive script, or a few "tactical" smaller ones. It's completely up to you and dependent on your requirements. Here's what ours will look like:
Code Listing 72: DataCreator.ps1
- #initialization
- param($url = $(Read-Host -prompt "Url"))
- $articleUrl = $url + "/category/rollup";
- #ensure sharepoint
- if ((Get-PSSnapin -Name Microsoft.SharePoint.PowerShell -ErrorAction SilentlyContinue) -eq $null)
- {
- #load snapin
- Add-PSSnapIn Microsoft.SharePoint.PowerShell;
- }
- #create categories
- New-Category -Url $url -Category "Category 1" | Export-Csv -NoTypeInformation -Path C:\Categories.csv;
- New-Category -Url $url -Category "Category 2" | Export-Csv -NoTypeInformation -Path C:\Categories.csv -Append;
- New-Category -Url $url -Category "Category 3" | Export-Csv -NoTypeInformation -Path C:\Categories.csv -Append;
- #create articles
- New-Page -Url $articleUrl -PageLayout "DDDWebPartPageLayout.aspx" -Title "Page 1" -Category "Category 1" | Export-Csv -NoTypeInformation -Path C:\Pages.csv;
- New-Page -Url $articleUrl -PageLayout "DDDWebPartPageLayout.aspx" -Title "Page 2" -Category "Category 2" | Export-Csv -NoTypeInformation -Path C:\Pages.csv -Append;
- New-Page -Url $articleUrl -PageLayout "DDDWebPartPageLayout.aspx" -Title "Page 3" -Category "Category 3" | Export-Csv -NoTypeInformation -Path C:\Pages.csv -Append;
In Line #3, we take the URL parameter (which is to the site collection) and append the bits for the article sub site. This way, the script can pass the correct URL to the commandlet's SPMetal calls so that the correct underlying SPWeb will be accessed. Next, DataCreator.ps1 does the typical initialization stuff and then calls our commandlets in order.
For each block of commands, it pipes the output into an Excel file. I generally split these out by schema; all commandlets with the same return type generally go into the same CSV. You can call it by entering ".\DataCreator.ps1 –url http://ddd.local" (minus the quotes) into PowerShell. Here's what things look like during and after the script is run:
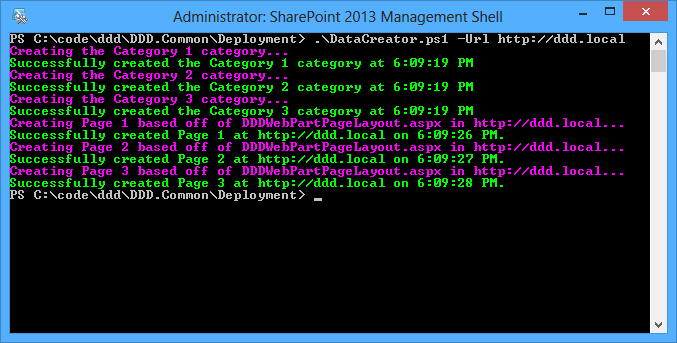
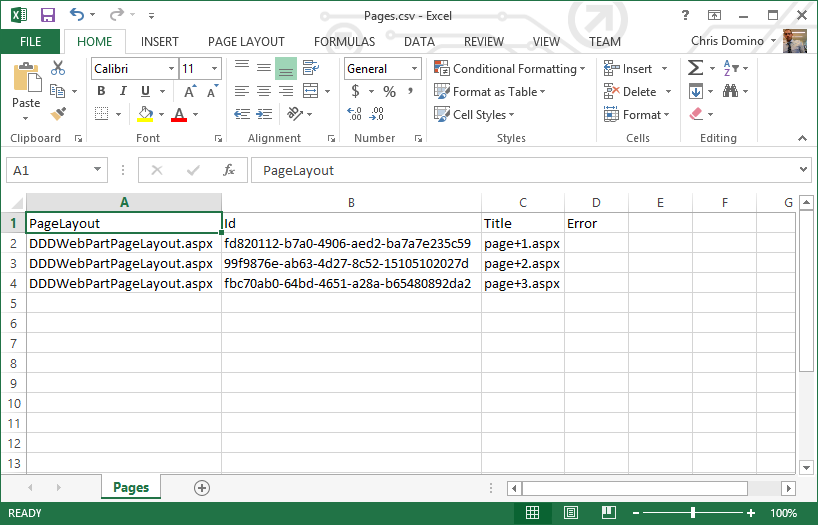
These Excel files make a great log for tracking what content is provisioned. Finally, let's add this to our DoEverythinger.ps1 script. Since there are no features to activate or additional operations to perform, we simply need to redeploy our WSP every time we push out new code in our commandlets. Add the following bits to the file (new lines are bolded):
Code Listing 73: DoEverythinger.ps1
- ...
- #deploy
- Write-Host;
- Write-Host ("Deploying Solutions") -ForegroundColor Magenta;
- $script = Join-Path $path "\SolutionDeployer.ps1";
- .$script -wsp DDD.Data.wsp;
- $script = Join-Path $path "\SolutionDeployer.ps1";
- .$script -wsp DDD.Web.wsp;
- $script = Join-Path $path "\SolutionDeployer.ps1";
- .$script -wsp DDD.DataCreator.wsp;
- $script = Join-Path $path "\SolutionDeployer.ps1";
- .$script -wsp DDD.WebParts.wsp -url $siteUrl;
- #reset
- ...
This is the most remedial example of the data creator. Advanced versions do things like dump Lorem Ipsum into text / HTML fields, allow for the configuration of creating a certain number of items, (for load testing) and give the option of clearing out certain lists first. Data creators are almost always unique to every project; I really just wanted to show the skeleton of how this component of DDD is put together.
