


The Execution
Finally, we have everything we need for an All Code deployment. Like I said before, we can effectively use different combinations of the scripts for different deployment scenarios. As we run through the various execution procedures, I'll omit a few assumptive steps, such as making sure all Visual Studio references are correct, the code complies, the PowerShell files are saved, and any PowerShell windows have been cycled to clear out any "stale" versions of previously-loaded assemblies.
What follows are few different deployment paradigms you'll see in the lifecycle of a SharePoint development project. In all of them, we're working with the same components: PowerShell scripts, Visual Studio, the SharePoint API, etc. The differences are how these tools are orchestrated to facilitate the main goal of each paradigm.
Basic Development Deployment
This one is simple and fast, but has some manual processes involved. It is the one I use when I'm in the thick of things while building out my feature receiver:
- Run "SiteCollectionResetter.ps1" to blow away and recreate your site collection.
- Update your feature receiver logic (concurrently while Step #1 above runs).
- Right-click-deploy your feature.
- If you are using Visual Studio auto-activation (either by setting the "ActivateOnDefault" attribute of the "Feature" element in Structure.Feature.XML file to true or by using a Deployment Configuration in the SharePoint project's properties "SharePoint" tab that activates the features) then you're done.
- If you are using the "FeatureActivator.ps1" script, run that now.
Integrated Development Deployment
If you'd rather have everything run in a single automated step, (and don't mind waiting for potentially long-running deployment scripts to complete) you can plug your deployment scripts into your Visual Studio right-click-deploy. This is really nice because with one click, everything you need for deployment is executed; the downside, like I said, is that it's slower.
But if you ever lose hours of time tearing through your deployment script in anger, wondering why the latest code isn't being executed, and starting to doubt your general grip on reality because you've been working in the same PowerShell window all day and old DLLs are cached in it, you might be willing to wait the extra few seconds...
This process involves creating a new console app project in your solution that builds the command line needed to kick off a PowerShell process pointing to our master script (DoEverything.ps1). Why not do this directly in the post-build event or post-deployment command line in the project settings? Because PowerShell is a bit ornery when automated via Visual Studio builds.
Not only do we have issues around a 32-bit process (Visual Studio) kicking off a 64-bit process (PowerShell; as we've seen the 32-bit PowerShell can't load 64-bit SharePoint DLLs), but there are some security features precluding PowerShell from taking in parameters when used in this manner. So to get around these awesome limitations, we build the console app in 64 bit mode, and kick that off in the post-deployment command line. (The post-build event won't work, since Visual Studio deploys the solution after the build.)
Let's start by looking at how to set this up:
- Add a new "Console Application" to your solution. Name it "DDD.ScriptRunner."
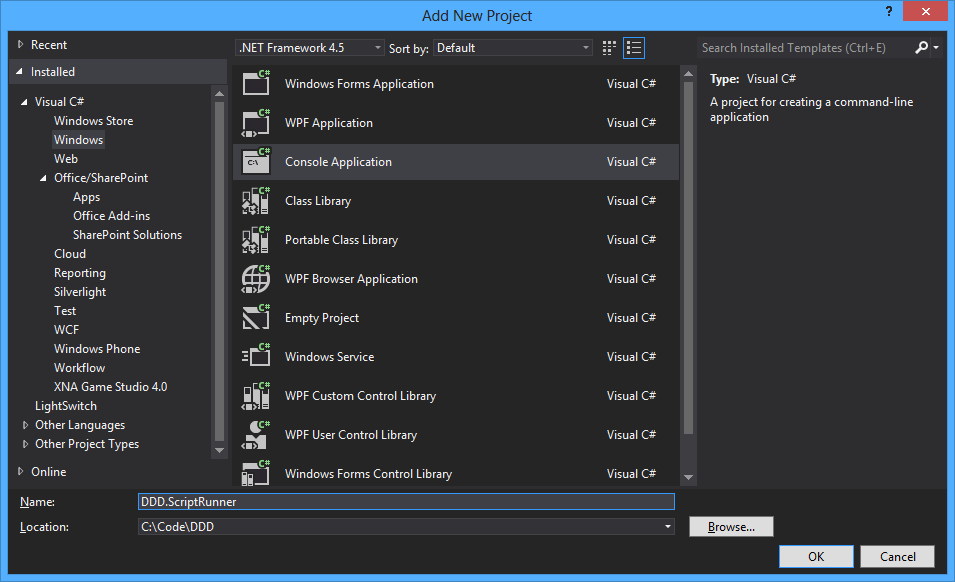 Creating the Script Runner project
 - In its project properties, make it 64-bit.
 Selecting 64 bit
 - Also, set its output directory to your Deployment folder.
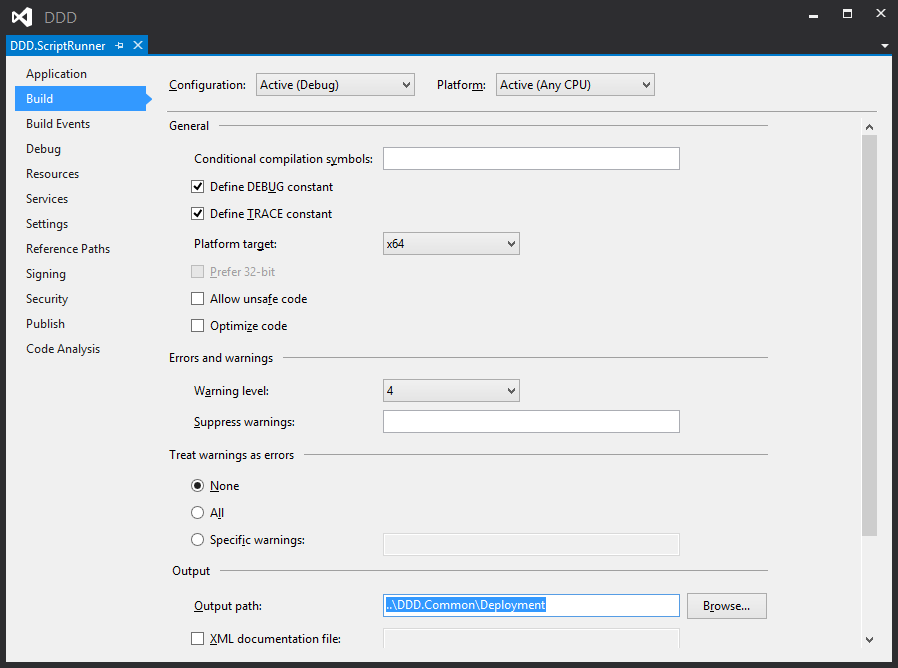 Setting the Output path
 - Tell DDD.Web (in its properties windows) to kick off DDD.ScriptRunner after a deployment.
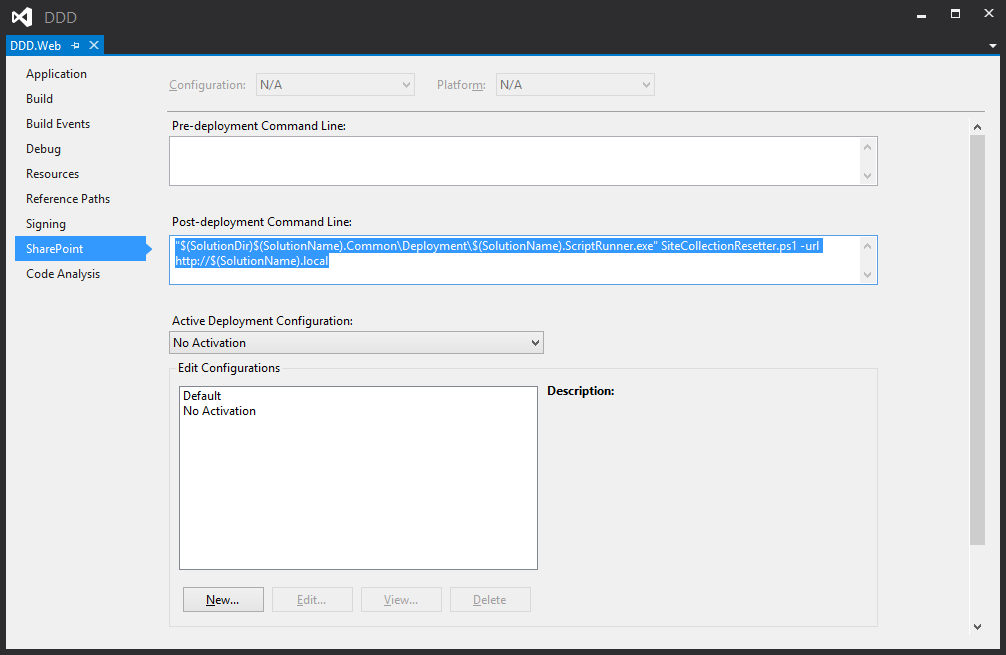 Setting the Post-deployment command
Let's look at the command line a bit closer:
- First, we have the most dynamic way possible to call the exe (don't forget the quotes):
"$(SolutionDir)$(SolutionName).Common\Deployment\$(SolutionName).ScriptRunner.exe"
- After a space, the first argument is the script to run (you can change this to <whatever>.ps1 you need):
SiteCollectionResetter.ps1
- After another space, go the arguments to pass to the PowerShell script itself (separated by spaces). For SiteCollectionResetter.ps1, it's the URL to the web app. This is also dynamic:
-url http://$(SolutionName).local -url http://$(SolutionName).local
[Note: If you ever want to "comment out" your post build deployment command line, (but not remove it) precede it with "REM" and a space. How oldskool DOS! This way, you can quickly switch from basic to integrated development deployments, and then back if you need to crank through a code-heavy part of your project (and therefore need your right-click-deploy to simply GAC your code and copy your files) but not lose your command.]
By using the hosts file for our URL and the stringent naming convention I've introduced, we can use Visual Studio build event macros to infer most of our command line. Also you might have noticed that we are using standard Windows PowerShell, not the SharePoint shortcut that preloads the associated commandlets and assemblies.
This is where ScriptRunner comes in. It uses the sexy System.Management.Automation namespace to automate PowerShell from C# code. Since the exe has already been configured to run in a 64-bit process, all we have to do is programmatically spin up a scripting environment, add the SharePoint snap-in, and then kick off the script using the args that we've passing to ScriptRunner from the post-deployment command. The overall flow looks like this:
- Right-click-deploy DDD.Web
- DDD.Web builds and deploys
- The post deployment command executes, invoked the ScriptRunner process, and passes its args to it.
- ScriptRunner creates something called a PowerShell Runspace, which is sort of the behind-the-scenes infrastructure that supports the scripting environment.
- The SharePoint snap-in is added to the Runspace.
- The script we want to run is the first arg, and an absolute path to this ps1 file is created to stuff into a StringBuilder.
- The rest of the args passed to ScriptRunner are appended to the StringBuilder with spaces between them. This forms a single line of text that matches what we'd manually type into PowerShell.
- The command is invoked. I stop here; you can optionally gather the output and do something with it if you need to debug or watch for errors.
Now we're ready to look at ScriptRunner's code. Before the following will compile, we need to add a reference to the System.Management.Automation, which can be found here: C:\Program Files (x86)\Reference Assemblies\Microsoft\WindowsPowerShell\3.0 (on Windows Server 2012). Another thing to keep in mind is that if you change this code, make sure to rebuild the project; a right-click-deploy on DDD.Web won't compile ScriptRunner, unless you explicitly add a reference to it (which I wouldn't recommend). This will help you avoid stale code being executed when the post deployment command runs.
Code Listing 47: DDD.ScriptRunner.Program.cs
- using System;
- using System.IO;
- using System.Linq;
- using System.Text;
- using System.Management.Automation.Runspaces;
- namespace DDD.ScriptRunner
- {
- class Program
- {
- static void Main(string[] args)
- {
- //make sure we have at least one arg
- string script = string.Empty;
- if (args.Length < 1)
- throw new ArgumentException("No script to run.");
- else
- {
- //ensure script ends with .ps1
- script = args.First();
- if (!script.ToLowerInvariant().EndsWith(".ps1".ToLowerInvariant()))
- script = string.Concat(script, ".ps1");
- }
- //create runspace
- using (Runspace runspace = RunspaceFactory.CreateRunspace(new SilentHost()))
- {
- //add sharepoint
- PSSnapInException error = null;
- runspace.RunspaceConfiguration.AddPSSnapIn("Microsoft.SharePoint.PowerShell", out error);
- if (error != null)
- throw error.ErrorRecord.Exception;
- //create pipeline
- runspace.Open();
- Pipeline pipeline = runspace.CreatePipeline();
- //the first arg is the script to run; get it's full path
- string path = Environment.CommandLine.Split(' ').First().Trim('\"');
- path = path.Replace(path.Split('\\').Last(), string.Empty);
- path = Path.Combine(path, script);
- //the rest are args to the script itself
- StringBuilder sb = new StringBuilder(path);
- sb.Append(" ");
- args.ToList().Skip(1).ToList().ForEach(arg => sb.AppendFormat("{0} ", arg));
- //run
- pipeline.Commands.AddScript(sb.ToString());
- pipeline.Invoke();
- }
- }
- }
- }
Like I said, it's PowerShell code and a string manipulation party to format the args and build the raw script (which is just a single line of PowerShell representing the command to kick off our ps1 file). The idea is to put as much dynamic logic as possible here to take the pressure of needing to be environmentally agnostic off of the command line and the scripts themselves that are configured in DDD.Web's post deployment command. For example, Line #'s 20 and 21 forgive you if you forget to add ".ps1" to the name of the script you want to run from DDD.Web's post deployment command.
One annoying issue I had was building the absolute path to the script. Since ScriptRunner.exe is outputted to the same directory as our PowerShell scripts, we can be a little lazy when invoking them; we only need to figure out where we are on the first system once and then juts be relative from there. Unfortunately, Environment.CurrentDirectory wasn't returning C:\...\DDD.Common\Deploment like I expected; it was actually DDD.WebParts for some reason that I don't have the energy to track down.
This is why I use Environment.CommandLine in Line #35 to track down the actual path to ScriptRunner.exe; I then slice and dice from there. The only other interested piece of this is Line #29, which passes in a new instance of something called SilentHost. What is that? It's the thing that makes the following error (that almost ruined a Friday night for me) go away:
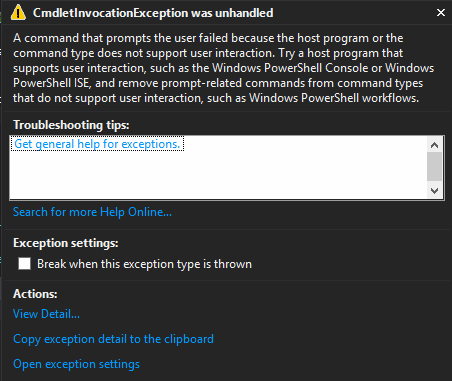
Basically, the problem is that you can't run scripts in the Runspace-ish "non-interactive" mode that have input or output to the console, because, well, there is no console. SilentHost makes this a non-issue by creating a fake UI that reads from and writes to nothing. It implements System.Management.Automation.Host.PSHost, overrides all the methods and properties, and returns nulls, default values, or nothing at all, allowing SiteCollectionResetter's Write-Hosts to safely do nothing in a host-less context.
Additional, PSHost has constituent System.Management.Automation.Host.PSHostUserInterface and System.Management.Automation.Host.PSHostRawUserInterface members, which play their own override-and-do-nothing game. I call my implementations "SilentUI" and "SilentUIRaw" respectively. Since I don't want to bore you with almost three hundred lines of empty setters and void methods, I'll just show you the skeleton of SilentHost and some quick examples of its screen silent nothingness. These three classes are in a separate code file under DDD.ScriptRunner called "Host.cs" and look like this:
Code Listing 48: DDD.ScriptRunner.Host.cs
- using System;
- using System.Security;
- using System.Threading;
- using System.Globalization;
- using System.Collections.Generic;
- using System.Management.Automation;
- using System.Management.Automation.Host;
- namespace DDD.ScriptRunner
- {
- public class SilentHost : PSHost
- {
- public override PSHostUserInterface UI
- {
- get { return new SilentUI(); }
- }
- ...
- }
- public class SilentUI : PSHostUserInterface
- {
- public override PSHostRawUserInterface RawUI
- {
- get { return new SilentUIRaw(); }
- }
- public override void Write(string value)
- {
- //silently do nothing
- }
- ...
- }
- public class SilentUIRaw : PSHostRawUserInterface
- {
- public override Size BufferSize
- {
- get { return new Size(0, 0); }
- set { /* silently do nothing */ }
- }
- ...
- }
- }
Override-and-do-nothing. Some non-void methods return PowerShell objects such as PSCredential or Dictionary<string,PSObject> or other non-primitives. Either return a new instance of the type, or null. As you can see from these methods, you can pretty much build your own PowerShell console app! However, this would be super involved; we're luck all we have to do is, well, nothing.
When you're done with this, new up a SilentHost and pass it to RunspaceFactory.CreateRunspace to allow Write-Hosts in your scripts. Read-Host (and other read/write methods) should work as well, but I didn't test it. Do make sure to provide the necessary arguments to feed values to your required parameters that will otherwise prompt the user for input; these calls will almost surely fail in "silent" mode.
Production Deployment
I tend to use the "Basic Development Deployment" script at the beginning of a dev cycle to quickly churn through the construction of my site's infrastructure so I can get to web part development as soon as possible. Then when I'm getting close to have something to show the client, I'll switch over to "Integrated Development Deployment" to more closely mirror what the following procedure will do up on the server.
Let's pretend that you have already finished reading this book, architected a beautiful SharePoint application pursuant to Deployment Driven Design, built a clean All Code deployment, and are ready to deploy your code to a production (or really any) server on your client's premises way early and way under budget. Nice work! When your code and scripts are done, it's time to get everything pushed; we need a way to make this nice and tidy.
First of all, what files do we need? Let's review.
- The WSPs. Duh.
- .PDB files for all assemblies our solution is going to GAC.
- Our PowerShell scripts.
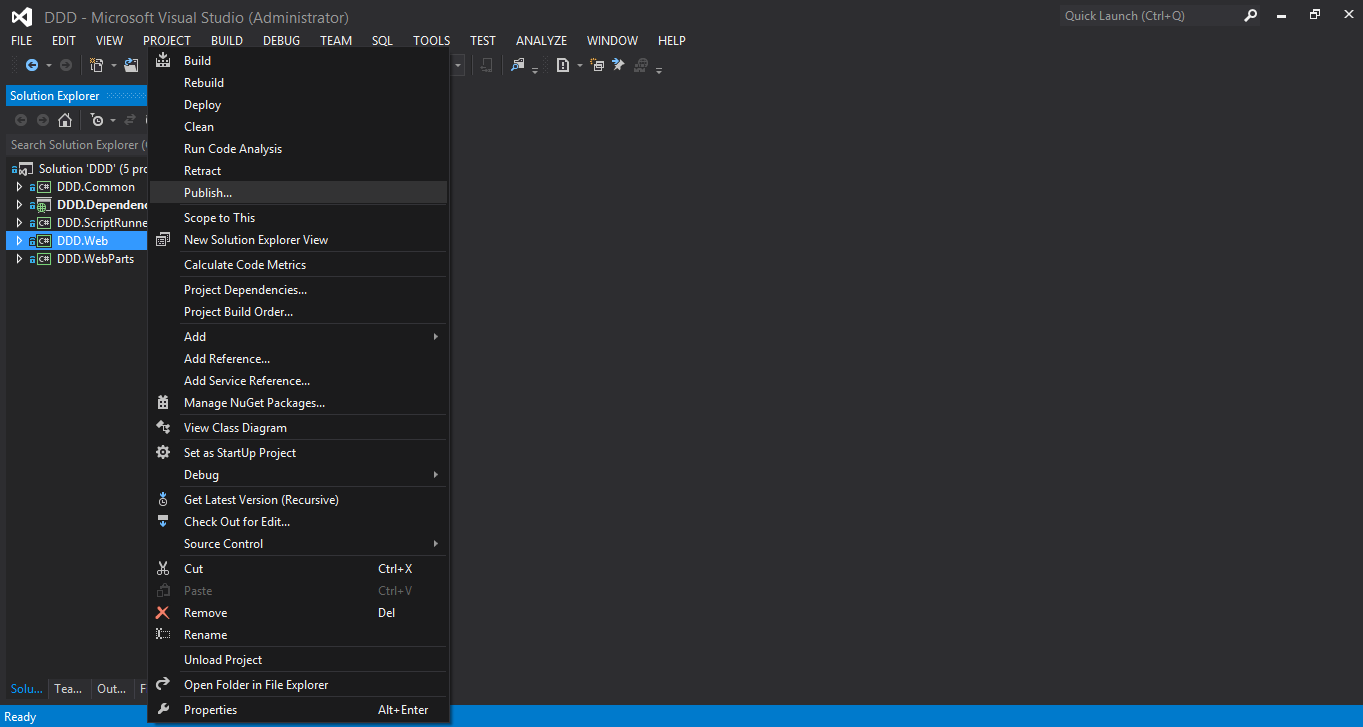
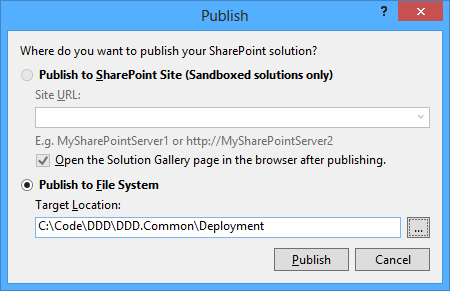
The goal is to get all these files in one folder as easily as possible. Fortunately, Visual Studio makes this, well, as easy as possible. Simply right-click your SharePoint project, and select "Publish..." This is new in Visual Studio 2012, replacing the "Package" functionality from 2010. Publish acts just like the built-in publishing functionality for web projects.
Make sure you select your desired configuration (Debug or Release) in Configuration Manager before publishing. Next, the following window will pop up. Pick your destination folder, and Visual Studio will build your project, package your WSP, and copy it to the aforementioned location.
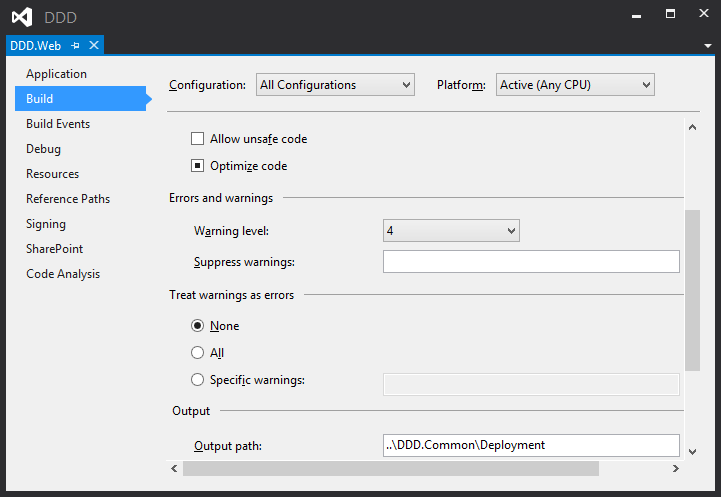
The only issue with this is that we don't get the DLL or PDB files from the publish command like we did from packaging back in 2010. We probably can do without the DLLs, but we want to be able to get to the PDBs in order to GAC them, thus giving us number lines in stack traces. The way I like to go about this is to configure my projects to build their output to DDD.Common\Deployment alongside the PowerShell scripts.
These two commands copy all PowerShell scripts from the Common project, and its PDB file. Add anything else you need. With all of the files that any of your scripts will reference guaranteed to be in the same relative path that they will be executing in, we can simply reference them by name in whatever context we need.
So for each project, you can change the output directory (Project properties -> Build tab -> Output section -> Output path field) to "..\DDD.Common\Deployment." (You can of course skip DDD.Dependencies and leave DDD.Common as is.) Make sure you do it for debug, release, and any other configurations you set up. As a quick shortcut, you can select "All Configurations" in the "Configuration" dropdown at the top of the tab.
Now all we have to do is copy everything in this folder up to the server (possibly to a child directory named with a timestamp under a parent deployment folder), fire up the SharePoint Management Shell (in the context of an account with proper permissions), navigate to this location, and run your "DoEverythinger.ps1" script with the necessary parameters. And there you have it: a single click and file copy that sets up an entire SharePoint deployment. Try it a few times on your local environment (outside Visual Studio) to make sure there are no snags, and you're ready to go!
Now that we have covered the different deployment paradigms, we can quickly tweak our development environment to switch among them. If we need to peel off a quick production deployment, publish all your SharePoint projects and copy your Deployment folder to the servers. Before going to prod, we can test out our DoEverythinger script or clean our environment with a fresh SiteCollectionResetter by modifying what we send to ScriptRunner in DDD.Web's post deployment command.
And in between, if you need to quickly push code to your local environment, just right-click-deploy. The Visual Studio / SharePoint integration will GAC DLLs and cycle app pools. I do need to warn about a thing that happens when we blow away site collections and cycle code over and over again in a development environment:
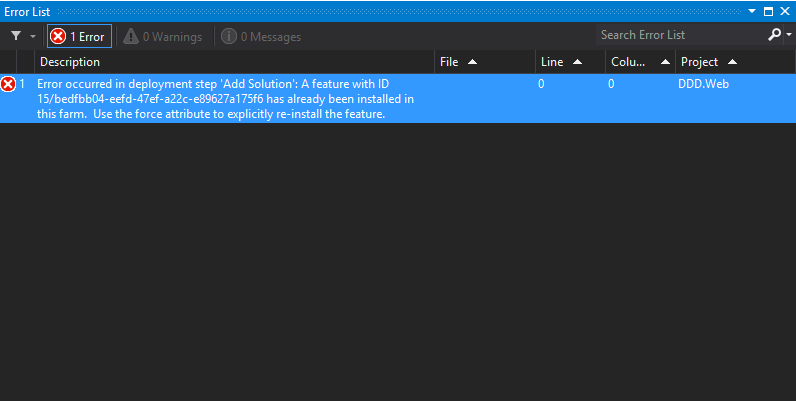
Things, for lack of a better term, get clogged. Specifically, the Deployment Configurations' "Retract Solution" step doesn't seem to uninstall features, and the "Add Solution" one doesn't use the force switch in its underlying PowerShell command to reinstall them. Editing these or rolling your own involves creating Visual Studio extensions and is outside the scope of this book.
Something I've had success with is setting the "AlwaysForceInstall" attribute to "true" in all my <Feature>.template.xml files. As I described at the beginning of the book, this does exactly what it says it does: installs the feature even if it's already installed. I looks like Visual Studio is respecting this; I haven't gotten the error since I started setting this.
Now if this doesn't work, we'll have to deal with this the old-fashioned way: cycle Visual Studio, cycle IIS, cycle the timer service, then do a clean DoEverythinger. One everything has been flushed and the WSPs have been deployed proper front to back, Visual Studio usually starts cooperating. Worst case, you can always reboot your machine. I'm sorry I don't have a better answer than to revisit our SharePoint 2003 environment remediation methods.
Master Page / Page Layout Development Deployment
I noted earlier in the master page section that one drawback of All Code deployments for HTML pages (both master and layout) is that they are customized in the site collection's master page gallery. This is fine for production deployments, but is annoying during development: we don't want to have to kick off an entire All Code deployment (or even just a right-click-deploy) to simply test out a tweak to the master page or a page layout's HTML.
Well, Visual Studio build events, PowerShell, and ScriptRunner to the rescue! By wiring ScriptRunner into the build events of the DDD.Web project, we can kick off a script that will basically execute the branding section of our Structure feature receiver to shove the latest markup into the master page gallery. Then all we have to do is refresh the page in the browser to see our changes.
This is important because we want to make sure these files don't become customized in the gallery and continue be loaded from _layouts. Manually uploading files to the gallery, although a temping shortcut, will unhook the SPFile (in the gallery) from the ASPX file (in _layouts). So we need the benefits of an All Code deployment, with a snappy code, build, switch to the browser, and refresh development experience.
First, add a new script called PageDeployer.ps1 to DDD.Common\Deployment:
Code Listing 49: PageDeployer.ps1
- #initialization
- param($url = $(Read-Host -prompt "Url"))
- #ensure sharepoint
- if ((Get-PSSnapin -Name Microsoft.SharePoint.PowerShell -ErrorAction SilentlyContinue) -eq $null)
- {
- #load snapin
- Add-PSSnapIn Microsoft.SharePoint.PowerShell;
- }
- #get web
- $web = Get-SPWeb -Identity $url;
- #load DDD.Common
- [System.Reflection.Assembly]::LoadWithPartialName("DDD.Common");
- #call DDD.Common.Utilities.UpdatePageHTML for each folder in _layouts to update
- Write-Host ([DDD.Common.Utilities]::UpdatePageHTML($web, [DDD.Common.Constants+Misc]::MasterPageRelativePath));
- Write-Host ([DDD.Common.Utilities]::UpdatePageHTML($web, [DDD.Common.Constants+Misc]::PageLayoutsRelativePath));
Most of the code to programmatically manipulate an SPFile in an SPFolder is a bit too involved for PowerShell development. So all this little cutie does is gets the parameters from the Web project's build event, news up an SPWeb, and then calls a .NET method from our DDD.Common.Utilities class to do the dirty work of recursing though the supplied folder and updating all files it finds.
Another reason I went this route is because much of the logic was already implemented in this class; in fact UpdatePageHTML is a subset of the aforementioned AddPageToMasterPageGallery method, mimicking the logic that actually overwrites the file and handles all the checking in and out. This is a pretty interesting way to get build events to execute arbitrary code elsewhere in your solution. If you need to debug any of this, just make sure to compile in debug mode and throw a System.Diagnostics.Debugger.Launch(); call wherever you want to break into the code. Just don't check it in!
Next, let's check out the code that does the copying:
Code Listing 50: Utilities.cs
- public static void UpdatePageHTML(this SPWeb web, string path)
- {
- //initialization
- path = SPUtility.GetVersionedGenericSetupPath(path, 15);
- SPFolder gallery = web.Lists[Constants.Lists.MasterPageGallery].RootFolder;
- //process files
- foreach (string file in Directory.GetFiles(path).ToList())
- {
- //overwrite each file
- Utilities.UpdateMasterPageGalleryFile(web, gallery, file);
- }
- //process sub folders
- foreach (string directory in Directory.GetDirectories(path))
- {
- //recurse
- web.UpdatePageHTML(directory);
- }
- }
- public static SPFile UpdateMasterPageGalleryFile(this SPWeb web, SPFolder gallery, string path)
- {
- //initialization
- SPFile file = null;
- string fileName = path.Split('\\').Last();
- //add to master page gallery
- using (StreamReader sr = new StreamReader(path))
- {
- //check for existing file
- file = gallery.TryGetFile(fileName);
- if (file == null)
- {
- //if the file doesn't exist, we're done; this is only an update operation
- throw new NullReferenceException(string.Format("{0} was not found in the {1} master page gallery.", fileName, web.Url));
- }
- //check out file
- web.CheckOutPage(file.UniqueId);
- //overwrite master page
- file = gallery.Files.Add(fileName, sr.BaseStream, true);
- file.CheckInPublishApprove();
- }
- //return
- return web.GetFile(file.UniqueId);
- }
Like I said, this is a subset of the AddPageToMasterPageGallery method. It takes in a path to somewhere under _layouts (not the project directory, since we need the compilation to take place so that Visual Studio can tokenize the markup files' FQNs before deploying them to 15) and, in the first method, recuses through the sub folders, passing all leaf files to UpdateMasterPageGalleryFile.
This method actually does the work of parsing the passed in file path to get the file name, opening it and getting the bytes, acquiring a reference to the web's corresponding SPFile, checking it out, overwriting it, and then checking it back in. Since this is really update functionality only, Line #28 above will throw if this file cannot be found in the web.
Finally, for completeness sake, let's look at the Visual Studio build event that wires our new script into ScriptRunner. It's identical to previous examples of this technique, except of course that we're invoking a different script (and remember that you can "REM" out these build events to quickly turn this functionality on and off, as well as just close the PowerShell window that pops up while it loads the SharePoint span-in):
"$(SolutionDir)$(SolutionName).Common\Deployment\$(SolutionName).ScriptRunner.exe" PageDeployer.ps1 -url http://$(SolutionName).local
Make sure we have the latest Utilities code in DDD.Common deployed to the GAC, and this will work smoothly. Moving forward, a way to speed up your deployments with ScriptRunner is to have all your calls to ScriptRunner listed out in the DDD.Web's post-deployment command, and REM out all the ones you aren't currently using. This way, when you want to deploy a page, REM out the SiteCollectionResetter line; when it's time to blow away and start with a fresh site collection, REM out PageDeployment and keep SiteCollectionResetter in play.
Web.Config Mods
Let's see what our new site would look like right now after its first All Code deployment with branding, structure, and all other configuration:
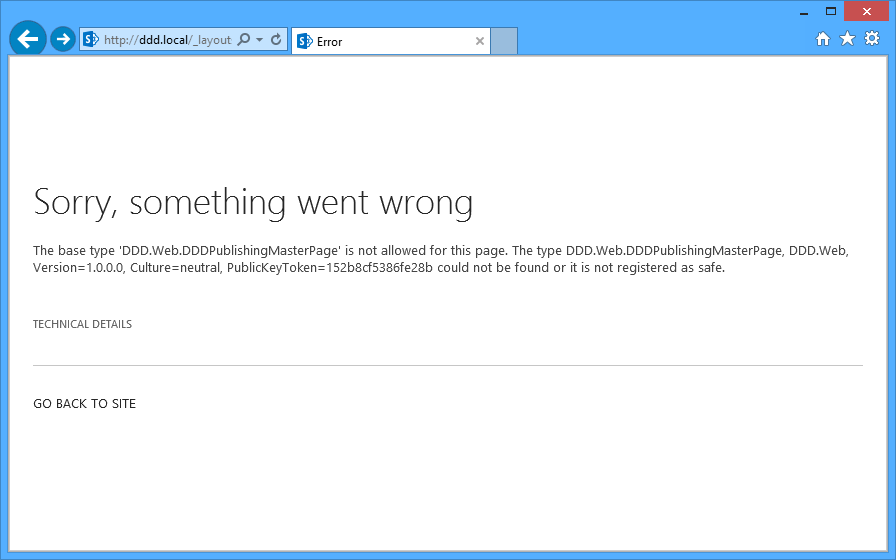
Damnit. Code-behinded pages in SharePoint need to be registered as SafeControls. Fail. Well, not really: I did this on purpose. By presenting this error before discussing its eventuality, I hope to show off some of the adaptability to doing an All Code deployment. Instead of running off to the web.config file to copy-and-paste an assembly FQN, let's take a step back to do this proper: with a web.config mod.
Although a bit clunky, the beauty of the SPWebConfigModification class is that it will manipulate the web.config file for your web application on all web front end servers in the farm. Win. I've worked with a few different patterns of implementing this guy, and settled on a simple one that uses an extension method to do the magic, putting the onus on the implementer to provide an XPath-ish entry name and value. (More complicated paradigms relieve some of the XPath pain, but require a lot of infrastructure to do so; not worth it.)
XPath, you ask? Yeah. It sucks, but this provides the SPWebConfigModification class the "hints" it needs to know where to add your new elements or attributes in the file, and a unique way to identify them. And it's not really XPath in terms of having to deal with navigators and XML documents; rather it's a hierarchy of nodes to where you want to apply your mod. For example, to create a new app setting, the XPath is just "configuration/appSettings." And of course, we'll be writing some smart code to generate as much XML as possible for us.
Since web.config files live within our web apps, we'd need to programmatically access the SPWebApplication object. No sweat. The problem is that since our structure feature is scoped at the site collection, it gets pissed when we perform hefty operations against its parent. So the answer is to create a new feature scoped to a web app, do all of our mods there, and impose an activation dependency to it on our structure.
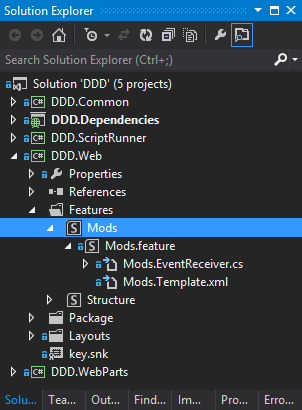
To make this happen, let's first create the feature.
- Add new feature to DDD.Web, called "DDD Mods."
- Do all the pretty stuff we did for the last two features (name, description, etc.)
- Ensure that it's scoped to "WebApplication."
- Edit the "Mods.Template.xml" file and add the following attribute: ActivateOnDefault="false" (This stops the annoying default behavior of application-scoped features activating themselves on all your web apps upon installation. I do this for all my web app features, as I discussed way back when I first introduced the Structure feature.)
- Add a feature receiver.
 Adding a feature receiver
Next we need to code the feature receiver. This is a rare one in All Code where we'll be implementing the FeatureDeactivated event as well; you'll see why later. Here's the code:
Code Listing 51: Mods.EventReceiver.cs
- using System;
- using System.Linq;
- using DDD.Common;
- using System.Reflection;
- using Microsoft.SharePoint;
- using System.Collections.Generic;
- using System.Runtime.InteropServices;
- using Microsoft.SharePoint.Administration;
- namespace DDD.Web.Features.Mods
- {
- [Guid("c1ce474d-34f9-4fce-8855-70ebba64c6a2")]
- public class ModsEventReceiver : SPFeatureReceiver
- {
- #region Events
- public override void FeatureActivated(SPFeatureReceiverProperties properties)
- {
- //initialization
- SPWebApplication app = ((SPWebApplication)properties.Feature.Parent);
- //load attributes
- Dictionary<string, string> attributes = new Dictionary<string, string>()
- {
- { "Assembly", Assembly.GetExecutingAssembly().FullName },
- { "Namespace", Constants.Misc.WebNamespce },
- { "TypeName", "*" },
- { "Safe", true.ToString() }
- };
- //add mod
- app.AddElementMod<ModsEventReceiver>(Constants.Mods.SafeControlElement, Constants.Mods.SafeControlXPath, attributes);
- //save
- app.UpdateMods();
- }
- public override void FeatureDeactivating(SPFeatureReceiverProperties properties)
- {
- //get web app
- SPWebApplication app = ((SPWebApplication)properties.Feature.Parent);
- //remove mods
- app.RemoveMods<ModsEventReceiver>();
- //save
- app.UpdateMods();
- }
- #endregion
- }
- }
All but the last line of the activation event are used to build the XML and XPath values for the mod. The name of each mod is an XPath expression that uniquely identifies it; the value is what gets physically written into the web.config file. AddElementMod is a generic method that adds an SPWebConfigModification to the extended web application object. The generic type parameter is used to specify the "owner" of the mod, so that the removal logic can identify the collection of modifications made by the calling feature receiver. This method takes care of creating and saving the mod; it's the job of the caller, like I said, in this simple architecture to pass in the values of the attributes.
RemoveMods takes in the same generic type parameter as AddMod, and uses that to query the app's modifications and delete all who have an "owner" property (which is just a string) that matches the full name of the provided type. This way, each mod is "owned" by whatever installed it. If you need more flexibility to remove specific mods or do anything else, these extension methods should provide a strong base on which to build. Finally, make sure to call UpdateMods after any add or remove operations. This forces the web app to kick off the job to update the web.config files on the web front ends.
Now, we need to update some of our existing constants and scripts (new lines are bolded). This is the main adaptability that allows us to continually be building a one-step deployment mechanism for our SharePoint portal. The hardest part of software development is when things that are already planned, completed, or deployed change. DDD appreciates this aspect of our lives, and is designed in such a way to make inevitable changes to your deployment paradigm as painless to keep up with as possible.
Code Listing 52: Constants.cs
- public static class Features
- {
- public static readonly Guid Mods = new Guid("85f12f8c-327b-4bb1-9297-7768e4fe1861");
- public static readonly Guid WebParts = new Guid("22bc19dc-4b6d-459a-9b6d-926fd07b61f1");
- public static readonly Guid Structure = new Guid("bedfbb04-eefd-47ef-a22c-e89627a175f6");
- }
- ...
- public static class Misc
- {
- public const string WebNamespce = "DDD.Web";
- public const string MasterPageRelativePath = @"TEMPLATE\LAYOUTS\DDD.Web\MasterPages";
- public const string PageLayoutsRelativePath = @"TEMPLATE\LAYOUTS\DDD.Web\PageLayouts";
- }
Here are the updates to the Feature Activator:
Code Listing 53: FeatureActivator.ps1
- ...
- #get feature guids
- [System.Reflection.Assembly]::LoadWithPartialName("DDD.Common");
- Write-Host;
- $mods = [DDD.Common.Constants+Features]::Mods;
- $webparts = [DDD.Common.Constants+Features]::WebParts;
- $structure = [DDD.Common.Constants+Features]::Structure;
- #activate mods (on the web application)
- Write-Host;
- Write-Host ("Activating Mods (on the web application)...") -ForegroundColor Magenta;;
- $script = Join-Path $path "\FeatureEnsureer.ps1";
- .$script -Url $url -Id $mods -Scope "webapplication";
- #activate webparts (on site collection)
- Write-Host;
- Write-Host ("Activating Webparts (on the site collection)...") -ForegroundColor Magenta;
- $script = Join-Path $path "\FeatureEnsureer.ps1";
- .$script -Url $url -Id $webparts -Scope "site";
- #activate structure (on the site collection)
- Write-Host;
- Write-Host ("Activating Structure (on the site collection)...") -ForegroundColor Magenta;
- $script = Join-Path $path "\FeatureEnsureer.ps1";
- .$script -Url $url -Id $structure -Scope "site";
- ...
And finally the Site Collection Resetter:
Code Listing 54: SiteCollectionResetter.ps1
- ...
- #get the web app
- $uri = New-Object System.Uri($url);
- $app = [Microsoft.SharePoint.Administration.SPWebApplication]::Lookup($uri);
- #clear mods
- $app.WebConfigModifications.Clear();
- ...
As you can see, I've added this to the FeatureActivator. I have seen issues where this doesn't work so well on farms with multiple front ends; we get errors around jobs already existing and concurrent updates conflicting. I have written experimental code that acts like Execadmsvcjobs and tries to deal with this, but it hasn't panned out. If you run into this, remove it from your PowerShell and do it manually though Central Administration. Meh.
So there we have it: programmatic control over all web.config files in our farm. Hell yes.
If you've been around hardcore administrative SharePoint code at all, you've no doubt seen or read that the SPWebConfigModification class is not exactly revered. People have come up with "best practices" and "tricks and tips" demonstrating when to use it, how to use it, and when to run for the hills. I think a lot of the negative publicity this class gets is simply due to the fact that it's hard to work with. Building XPath and XML expressions is hard (hence this book). Web application-scoped features are also hard, since their default behavior is to install themselves pervasively, almost virus-like, across your farm.
The actual difficulty lies in the face that if you screw up, broken fragments of XML get "stuck" in your web.config files, and you have to blow away your entire web application to clear them out. Manual tweaks of the files can easily configure things even more. That's why we implement the feature's deactivated event: this process needs to be cleanly idempotent, since these mods are persisted in the configuration database.
To combat this, I came up with the following script that hunts down and destroys all modifications in your farm. Of course, keep this far, far, far away from production. However, it'll be quite handy for when you get into sticky situations the first few times your test out your new SPWebConfigModification. For example, let's consider the following scenario:
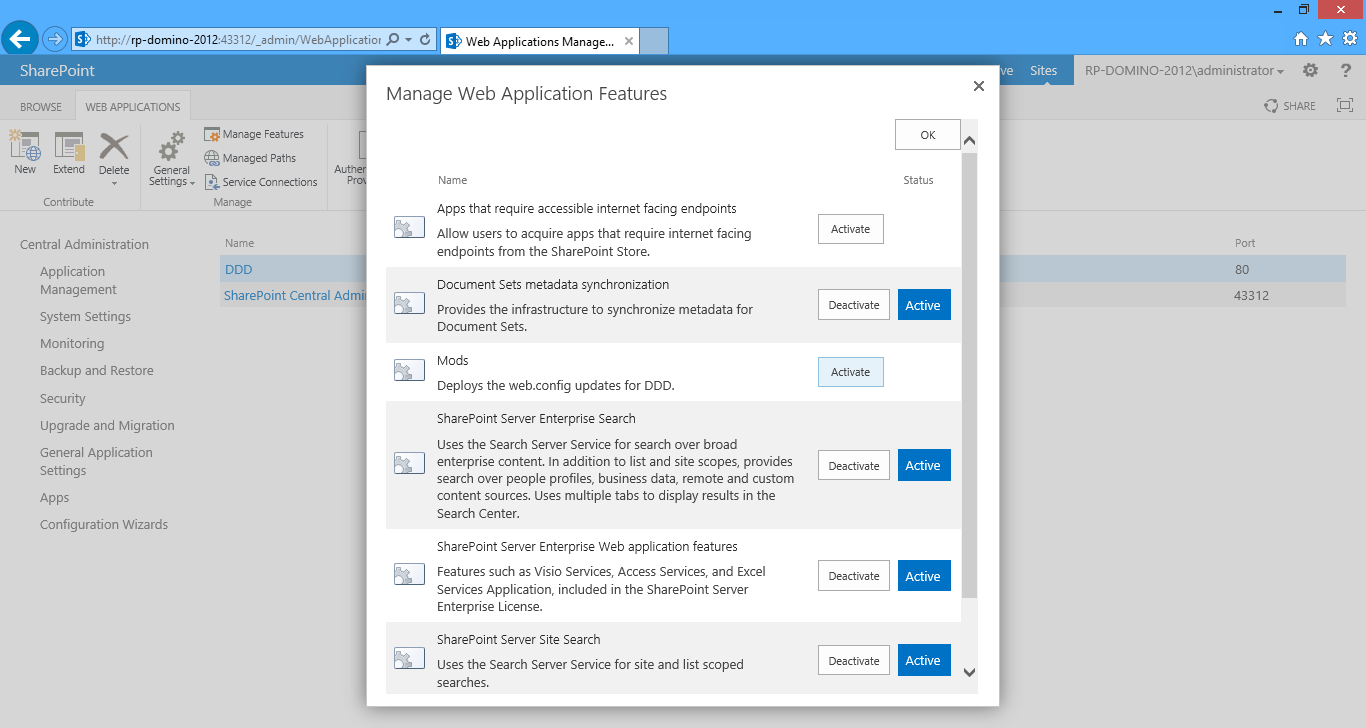
- You forget to mark the feature's "ActivateOnDefault" property to "false." Therefore, your feature activated event will register mods for ALL present (and even future) web apps.
- A bug is then introduced that bombs the feature activated event (probably raising an exception about bad XPath).
- You fix the code, and redeploy to your web app.
- It bombs again, but you notice in the error message that it's the previous code base failing to activate against a different web app.
- You mark "ActivateOnDefault" to false and redeploy.
- But we have the same problem, since that one buggy mod is still "stuck" in the other web applications' mod lists.
Indeed, we have web.config mod limbo all the same as deployment limbo! So what the following script does is spin through all web applications and clears out all modifications. If this is too heavy, feel free to change it, or add parts of it to our other deployment PowerShell scripts. Either way, it's really handy to have something like this when you start working on your mods (always do so in as isolated an environment as possible).
Code Listing 55: WebDotConfigModClearer.ps1
- #ensure sharepoint
- if ((Get-PSSnapin -Name Microsoft.SharePoint.PowerShell -ErrorAction SilentlyContinue) -eq $null)
- {
- #load snapin
- Add-PSSnapIn Microsoft.SharePoint.PowerShell;
- }
- #clear all the mods from a web app collection
- function ClearMods($apps)
- {
- #get all web apps
- foreach ($app in $apps)
- {
- #clear mods
- Write-Host ("Clearing mods for " + $app.Url + "...");
- $app.WebConfigModifications.Clear();
- $app.Update();
- }
- }
- #get web services
- Write-Host ("Loading web apps...");
- Write-Host;
- $services = [Microsoft.SharePoint.Administration.SPFarm]::Local.Services;
- #for all web services in the farm, operate on their web applications
- $services | where { $_.GetType().ToString() -eq "Microsoft.SharePoint.Administration.SPWebService" } | foreach { ClearMods($_.WebApplications); }
Like I said, this section was purposefully presented out of order. With SharePoint, we never know (or sometimes don't remember) when, despite all our best planning and Deployment Driven Design diligence, something will clog our Event Log and bring our deployment groove to a screeching halt. But we are adaptable. Blow away your site collection, code what you have you to code, and then keep iterating. When you're out of the woods, your deployment mechanism will be even more robust.
