


The SharePoint Project
Now that I've (hopefully) described in adequate detail the benefits of All Code (for SharePoint specifically) and Deployment Driven Design, (as an architectural paradigm in general) I'd like to discuss how the two come together to serve as a complete development experience. Think of Deployment Driven Design as the pattern and All Code as SharePoint-specific implementation of it.
Afterwards, we can get busy with some code.
At the heart of Deployment Driven Design is the practice of keeping yourself continually cognizant of deployment as you plan and build your application. The best case scenario is that you can deliver an architectural blue print, test cases, and a deployment document as soon as the requirements and use cases are signed off upon.
But we all know that's not going to happen; if there's one thing that might possibly be addressed after deployment on a typical project, it's documentation. So the second-best scenario is that your deployment is planned and built in conjunction with the rest of your project. This is something that Visual Studio's SharePoint integration is awesome at.
Using the project structure itself as a mapping to 15 and a manifest for your WSP forces you follow SharePoint deployment best practices. That's a win for everyone. But your solution skeleton is only the starting line from which All Code sprints. In fact, and this is coming from the SharePoint nucleotides that have bound themselves to my DNA over the years, Visual Studio might be doing too much goodness for us.
Deployment cycles are so fast now that I wonder if it's abstracting the underlining deployment mechanisms too much. A novice SharePoint developer can right-click-add web part, code it, F5 debug it, right-click-package it, and finally Email the WSP to a farm admin. That's cool and all, but it's so easy that I'm afraid developers won't gain a deep understanding of the SharePoint feature/solution constructs. They will ultimately find themselves in deployment hell when it comes time to get their stuff working on a SharePoint server that's not actually running Visual Studio.
(And if you install Visual Studio on your production SharePoint servers for deployment purposes, you're going to actual hell, not just deployment hell.)
My personal experience with this paradigm came from when I started with ASP.NET in the 1.1 days. I used the HTML designer and was amazed at how quickly I could churn out a web site. But what was happening was that I didn't know that I didn't know HTML. I could switch to code view and tweak something that I couldn't get at in the designer, but that didn't give me any insight as to how the page was being structured.
Then when it came time to fix cross-browser bugs or make CSS adjustments, I was completely lost. My experience only gave me tunnel vision into what was going on behind the scenes. It wasn't until I swore off the designer that the extent of the damage my myopic ways created was made manifest to me: the disgusting Visual Studio (2003) generated HTML, the horrific usage of view state, the sickening "un-separation" of concerns with CSS, HTML, and JavaScript all in the same file.
It wasn't until I went a level deeper than the out-of-the-box-quick-and-dirty way to do things did I gain clarity and understanding of the technology. To learn HTML, you need to write HTML, not learn a tool that generates HTML and be able to correct only its most heinous problems. I think it's the same game with Visual Studio 2012's SharePoint integration: by all means use the tool, but make sure you know how to do what the tool does as well.
In fact, whenever I install Visual Studio on a new build of a development machine or VM, the first thing I do is turn off the HTML designer!
Because there will be an "oh shit" moment – whether it's a botched deployment when the timer job service barfs, or a last minute bug, or an "An unexpected error has occurred" error – when the client is watching and the clock is ticking and you have to get in there, but you won't know what to do. So make sure you know what's going on; I don't want deployments to do to SharePoint what UpdatePanels did to ASP.NET AJAX.
The Environment
Before we look at the structure of the solution or any deployment code, let's first do some diligence to get our development environment up and running. First of all, the basics: Windows Server 2012 bare metal (not a VM), SQL Server 2012 Management Studio Express, Visual Studio 2012 (along with the Office 2013 tools), and SharePoint 2013. "Not a VM?" you ask? Indeed.
After dealing with so many performance issues and networking errors trying to get VMs to function as seamlessly as bare-metal server installations, I've given up. So I install the latest drivers and updates, follow the steps on http://www.win2012workstation.com/, install my software, and get to work. I have never been more productive in a VM than I have on a native install with native dual monitor support. Never.
When I install SharePoint 2013, I use the stand-alone option that comes with SQL Server Express 2008 R2 Service Pack 1. The two main reasons for this are the fact that I get all my service applications set up for free (which is no small task to do manually or via PowerShell) and I don’t have to screw around with setting up a domain controller. All I have to do is install Management Studio, and I've got my local development database tools as well!
Let's start with the general procedure I follow to get an easily deployable and debugable SharePoint project off the ground. This environment is designed to be for development purposes; I assume that the client has configured their service applications, tuned search, etc. in production; it's easy to sink a lot of time into doing all this locally. Once again, that's why I’m using the "stand alone" installation option here for my development farm.
-
Configure the SharePoint Windows services. I like to
ensure that the Timer service (now called "SharePoint Timer Service" in 2013)
is operating under the same security context as the account running the app
pools in IIS.
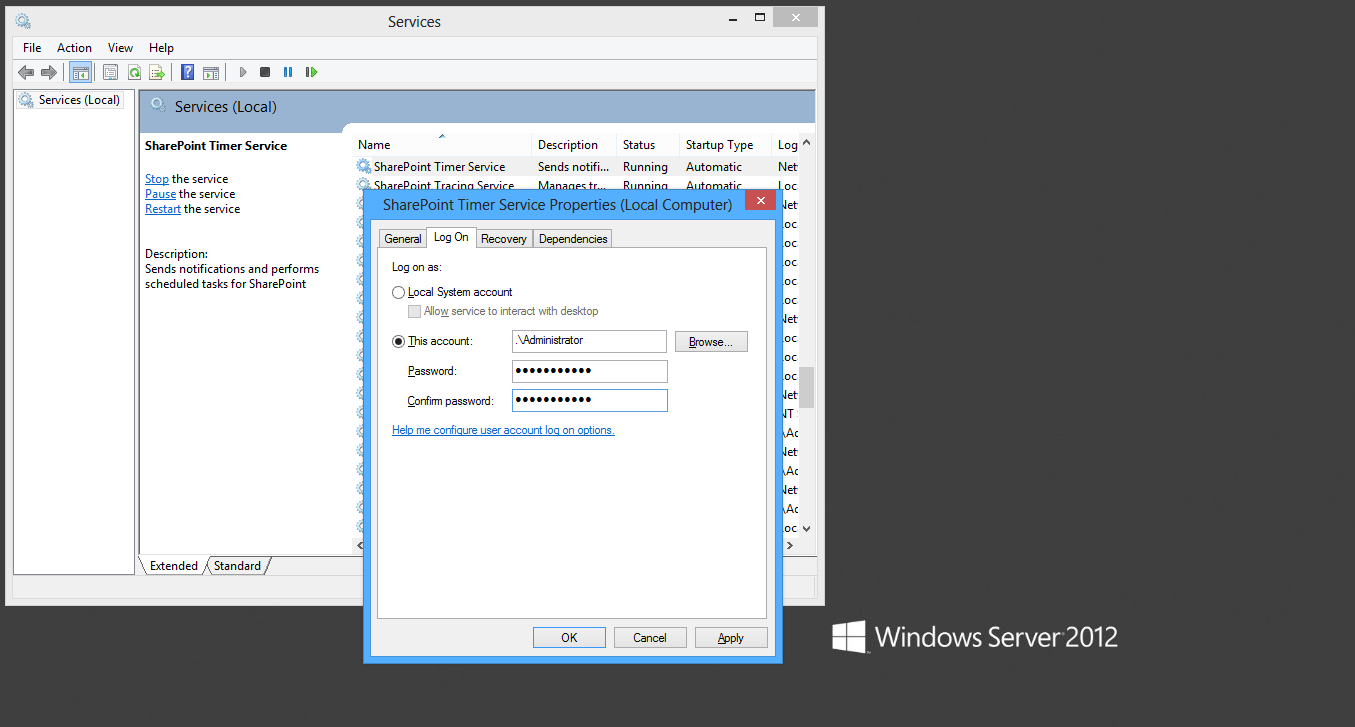 Configuring the SharePoint Windows services
-
Another step I take here is to make sure the SharePoint
Administration is started automatically when Windows wakes up. This ensures
that PowerShell commands (and even Central Administration operations) are able
to manage the installation and retraction of SharePoint solutions.
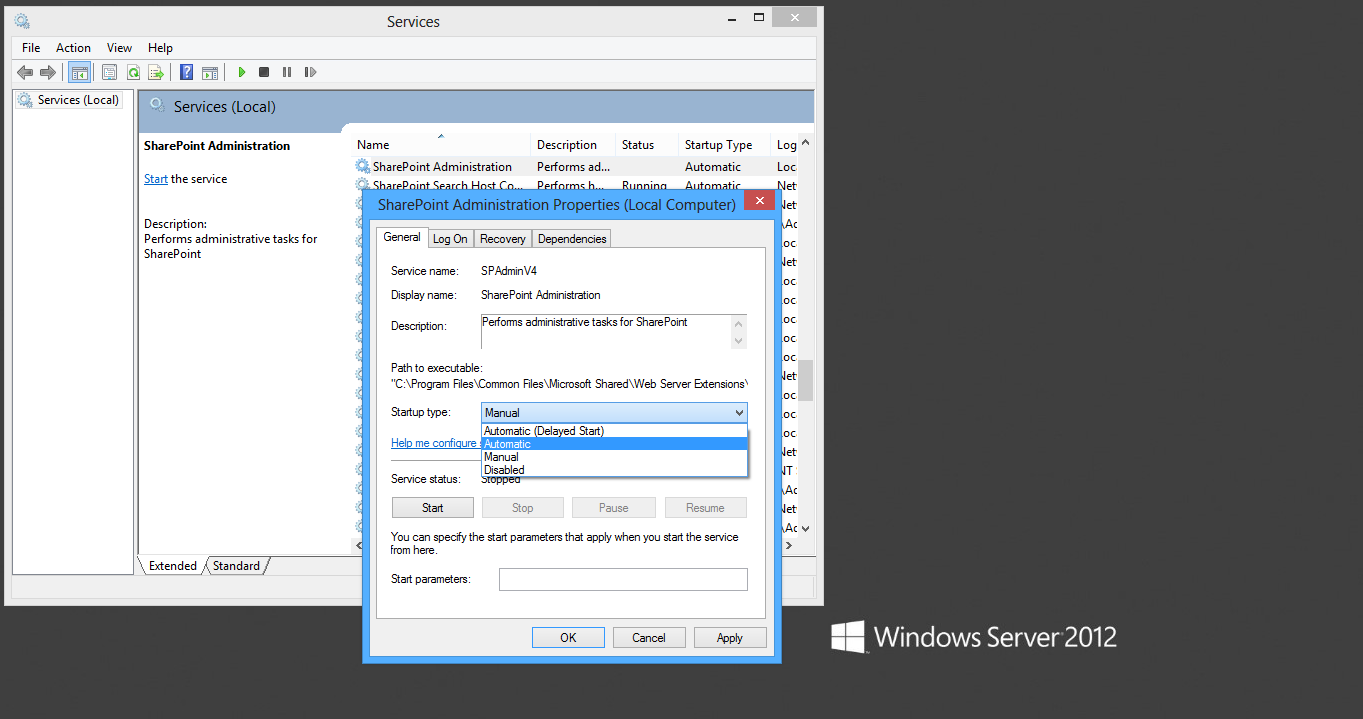 Autostarting the SharePoint Administration Service
-
Add the following entry to your hosts
file (C:\Windows\System32\drivers\etc\hosts):
127.0.0.1 ddd.local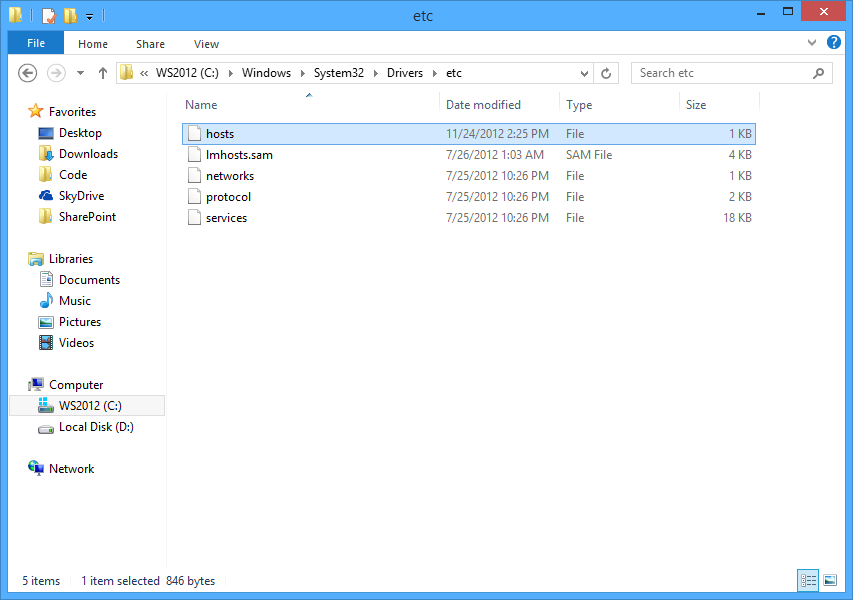 Locating the hosts file
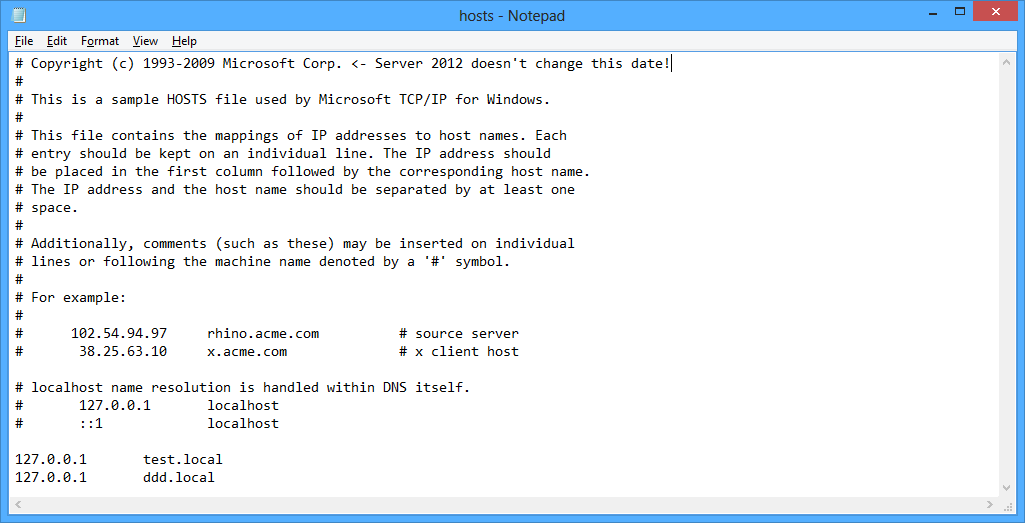 Updating the hosts file
-
Create a new web app in central admin
with all the normal settings, except put it in port 80 with "ddd.local" as the
host header.
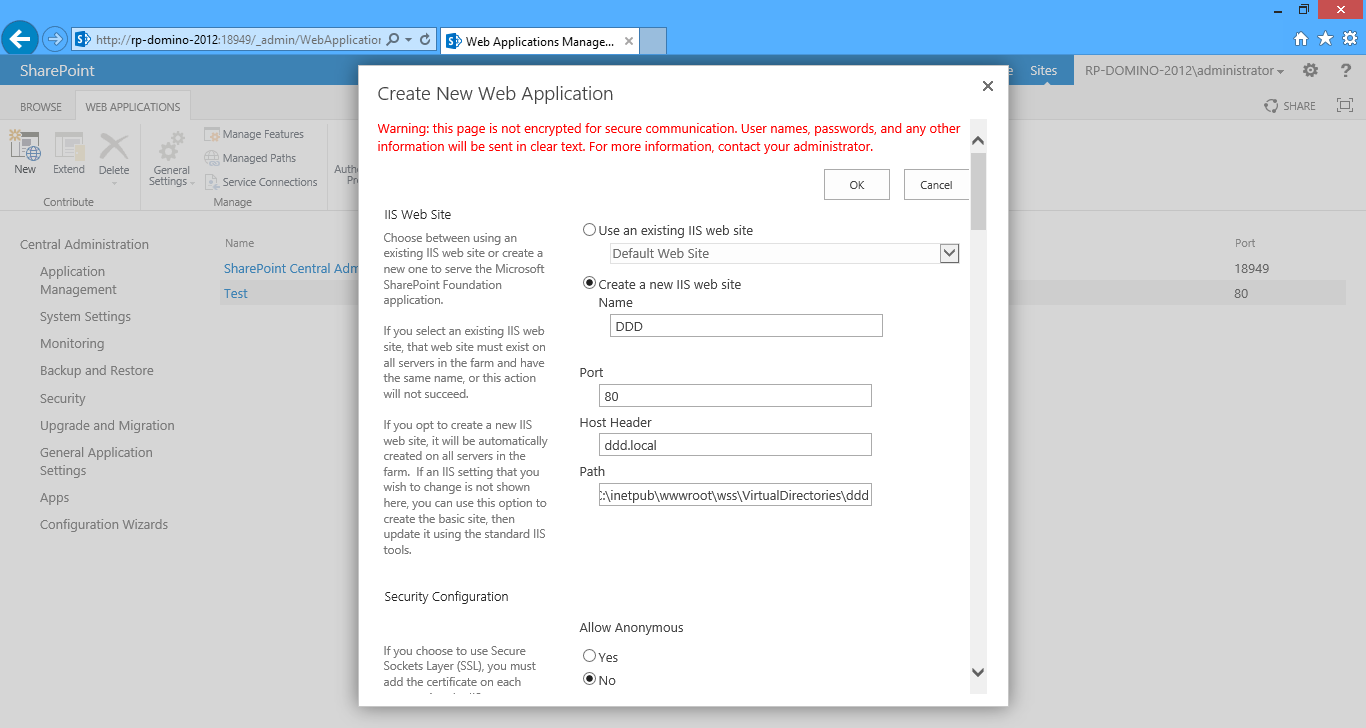 Creating a new web application
-
Create a root site collection called "Structure
Test" with no template (in the "Custom" tab).
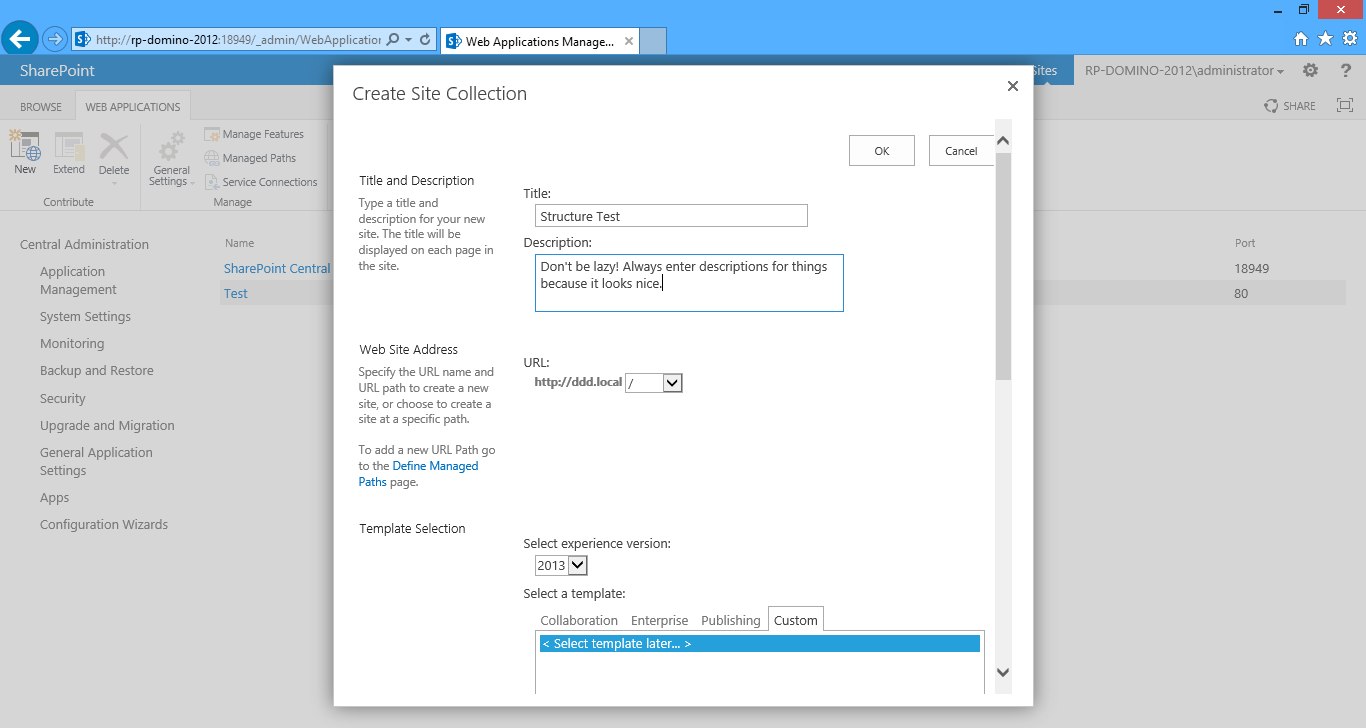 Creating the root site collection
I love the hosts file. DNS be damned: give me a simple little way to refer to my web apps both cleanly and canonically. There are so many benefits to taking the tiny bit of extra time to set your environments up this way; I'll sprinkle these in as they are apropos. However, there's one I want to hit on right now: web.config app setting / connection string sharing in a TFS scenario.
How often do we see the following nonsense whenever we're not the lone wolf developer on a project?
Code Listing 2: web.config
- <appSettings>
- <!--
- Tiffani:
- <add key="ServerURL" value="http://tiff-dev/ddd" />
- -->
- <!--
- Amber:
- <add key="ServerURL" value="http://winws899sh-g3h4ts/projects/ddd" />
- -->
- <!--
- Domino:
- <add key="ServerURL" value="http://ddd.local" />
- -->
- <add key="ServerURL" value="http://ddd.local" />
- </appSettings>
Ugh. It's fast; it's easy. Fine. But it's ugly; it will force you to constantly be updating your web.config file upon getting the latest from TFS, which will open up the possibility of erroneous entries making it into your production environment. One way to do it requires you to create a solution configuration in the Visual Studio Configuration Manager for each team member so that a web.config.<name of configuration> file gets generated for each person (and only upon a publish, not an F5 build).
This is not only annoying, but it's static, and requires a lot of convention to maintain. When you get the latest, you need to make sure you have the correct configuration selected. You might even need to create a "debug" and "release" configuration for everyone. It also adds to the headaches of configuring your build definitions. But by using a host file, everyone can use the same entries, then same solution configuration, and the same scripts.
The one gotcha with using host files (and specially host headers in IIS) on Windows Server is a lame ass security feature that doesn't allow these requests to authenticate via browser requests from the same box. And by "lame ass" I of course mean "Prudent and rigorous defense against hackers who can gain access to the computer but can't configure the following registry setting."
Computer\HKEY_LOCAL_MACHINE\SYSTEM\CurrentContolSet\Control\Lsa -> new DWORD -> "DisableLoopbackCheck" -> Set value to "1" -> Save.
The Solution
Before we can create any deployment goodness, we need to have our Visual Studio solution in place, which will contain one or more SharePoint projects. Since each SharePoint project maps to a WSP, some architectural decisions need to be made regarding how to organize your solution. Should all features be in one WSP? Should some be separate? How will our namespaces be organized? There is no correct right answer to any of these questions; they all depend on the intricacies of the project and its requirements, and could change for each new site.
As we go through the deployment script, we'll continue to use our web part-that-consumes-a-list example to demonstrate how this all works. Let's start with the checklist we came up with when applying Deployment Driven Design to the web part: this is everything we could possibly need to deploy it. The next step is to determine what we can leverage Visual Studio's SharePoint integration for; the rest will be All Code.
| Component(s) | Deployment Mechanism | Notes |
|---|---|---|
|
Visual Studio SharePoint Solution (package properties) |
These are configured via the property pages of the package itself or one of the features. |
|
Visual Studio SharePoint Solution (mapped folders) |
Artifacts like these (and many others: images, application pages, resource files, etc.) live under a SharePoint-mapped "Layouts" folder in Visual Studio, and are deployed to 15 automatically when the SharePoint solution is added to the farm. |
|
|
The physical master page itself is deployed along with the items in the above row. However, we'll need some All Code to apply the branding to our site. |
|
All Code |
All of these types of "functional assets" are deployed strictly via All Code. |
We'll be focusing on the All Code aspects of the solution, but most of the above will find their way into any standard SharePoint project. In any case, let's walk through the first few common steps to configuring a Visual Studio 2012 / SharePoint solution.
-
In Visual Studio, create a new blank
solution (I'm following the "DDD" naming convention; it makes sense that the
Visual Studio solution name and its projects' ensuing namespaces match the site
collection and/or web application title) and add an empty SharePoint 2013
project to it (I call these "<name of solution>.Web").
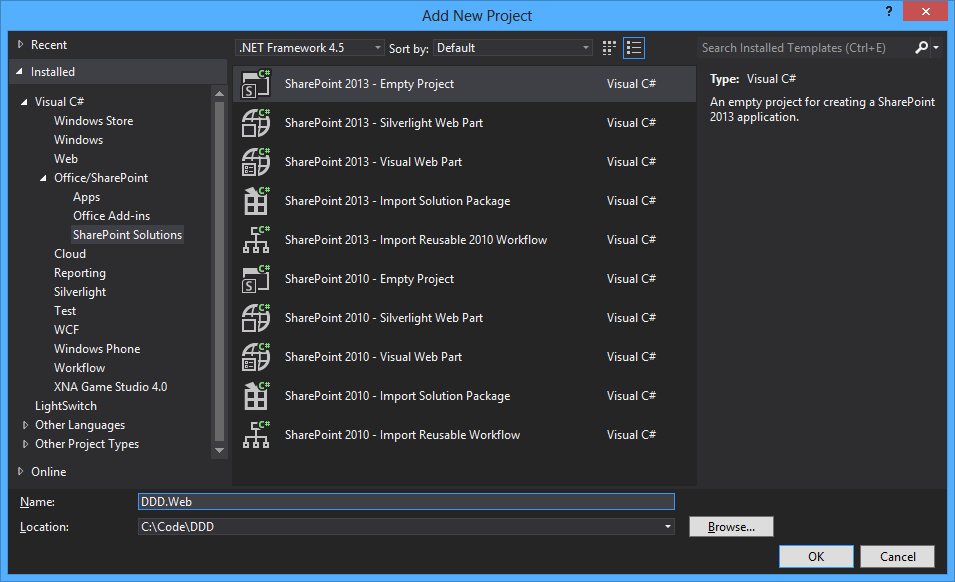 Provisioning a new Visual Studio solution
-
After you create the project, the
SharePoint wizard will ask you to connect it to an existing site (use the one
we just made). Select the second radio button, "Farm Solution," for the trust
level.
Note: Sandbox solutions are deprecated in SharePoint 2013 and therefore out of scope for this book.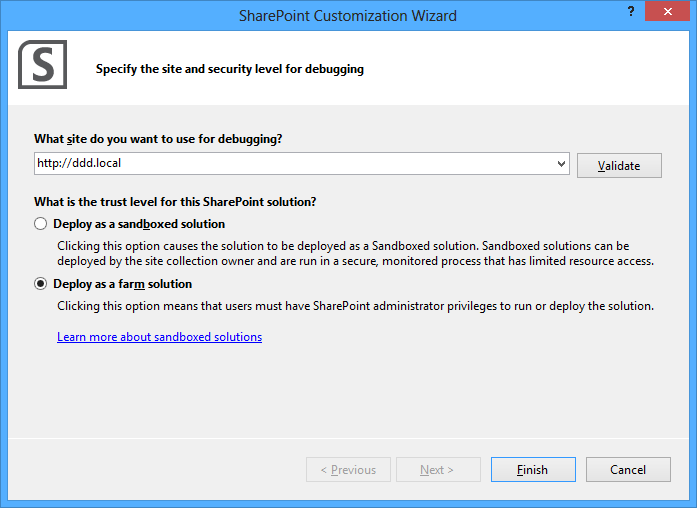 Configuring the SharePoint project
The Feature
Create a new Feature (right click the "Features" folder and select "Add Feature") called "Structure."
-
Visual Studio will name it "Feature1."
Just right click the Feature1 node, select "Rename" and call it "Structure."
This will recursively rename all the files.
 Prettying up a feature
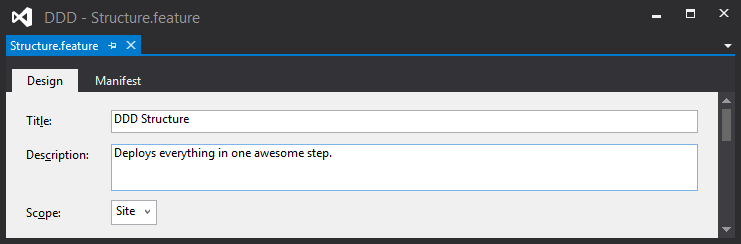
- Unfortunately, the title of the feature remains "DDD.Web Feature1" so we need to change it to "DDD Structure" (or whatever).
- Enter "Provisions the site structure, including web hierarchy, content types, and lists." (or whatever) for the description. I always like to append the solution name to the feature title, so it's distinguishable in the list on the Site Collection Features page of SharePoint's site settings. This is similar to how having tight namespaces for your projects make browsing the GAC for your assemblies much easier.
- Change the scope dropdown to "Site."
- Edit the "Structure.Template.xml" file under the "DDD.Web\Features\Structure\Structure.feature" node.
-
Add an "ActivateOnDefault" attribute
and set it "false" so our feature doesn't get intrusively installed on every
web application.
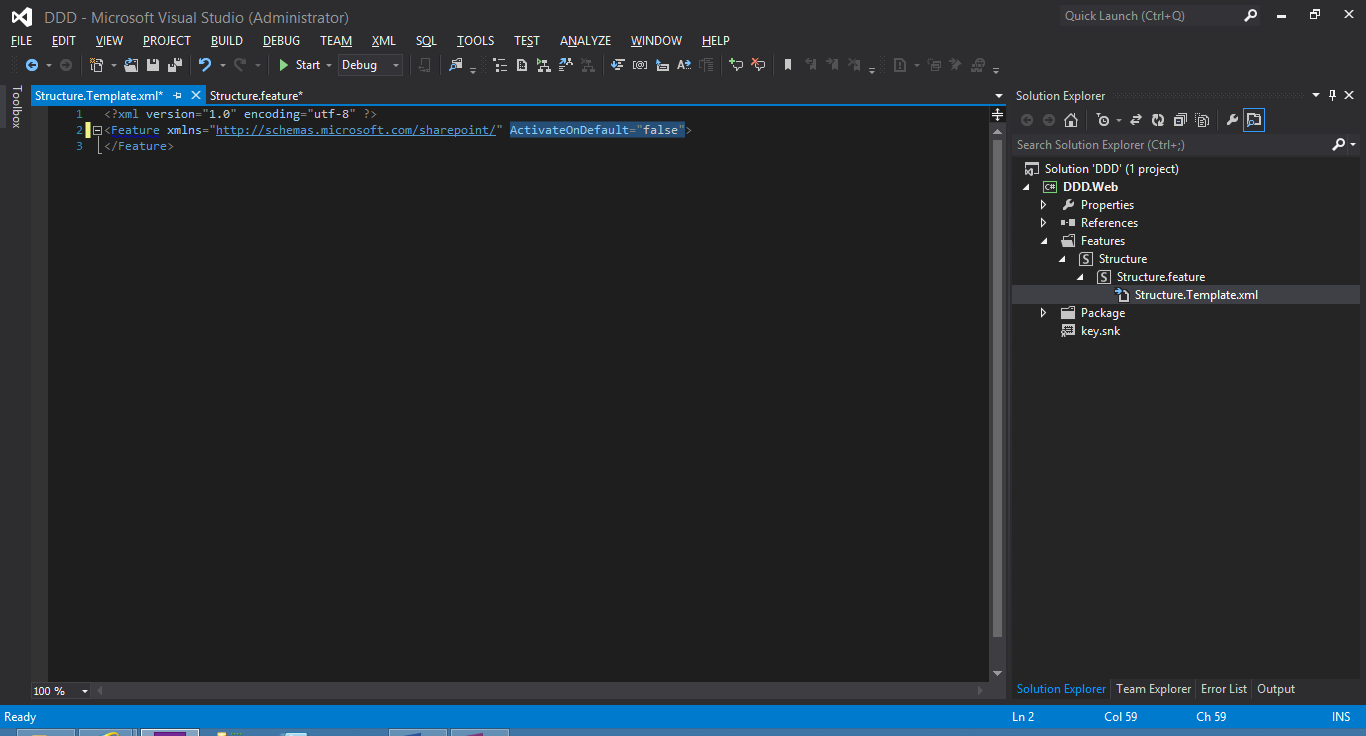 Configuring a feature for auto activation
Why use the site collection scope? I think it makes the most sense, since an SPSite and its RootWeb represent the logical top of the site/sub site hierarchy. They are also the true home of the content types that model the business objects that drive a lot of the requirements in the first place. All of this is usually determined during SharePoint information architecture exercises. Of course, any deployment can target any scope; there's no reason you can't script the provisioning of a web app or even a farm! Also there are no technical ramifications to your scope selection, since the SharePoint API allows us to easily start from any scoped entry point; we can get an SPFarm from an SPWeb if we have to.
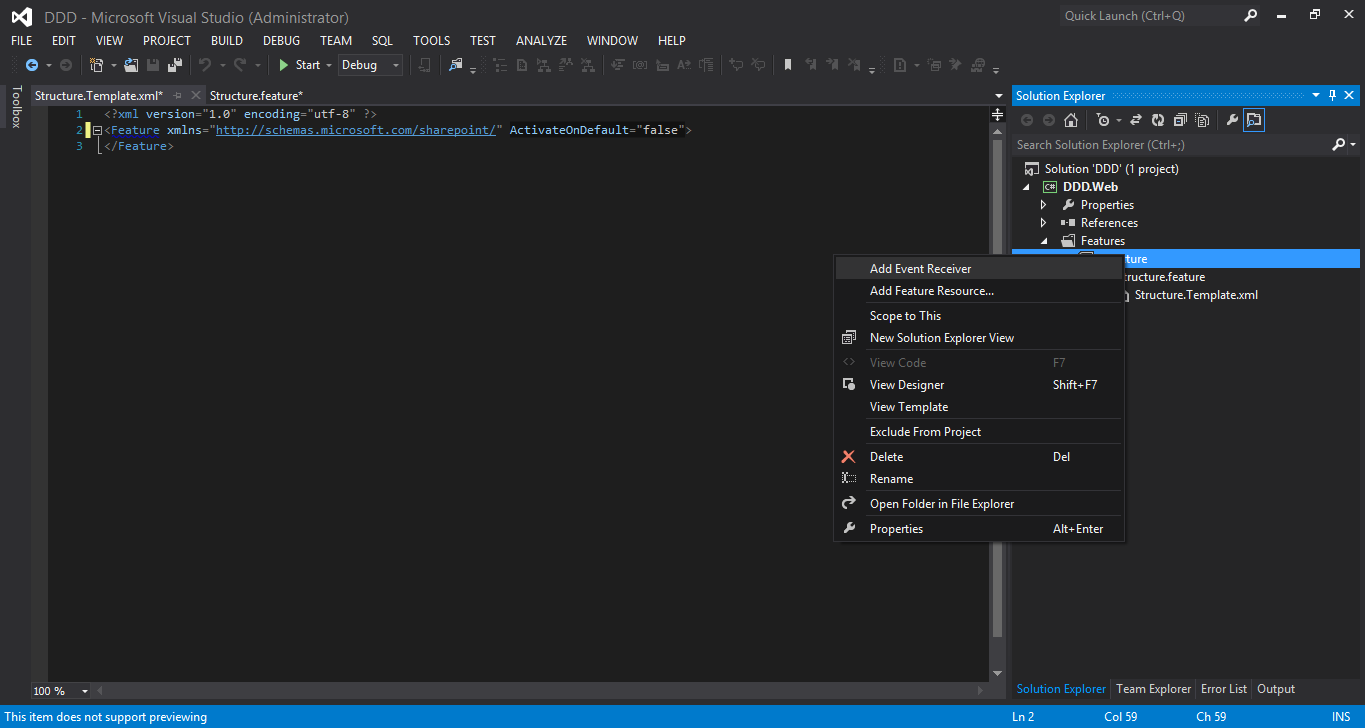
The Feature Receiver
Now that we have our feature,
let's create the receiver that executes our code. Right click our Structure
feature node, and select "Add Event Receiver."
We'll get back to the receiver in a second. First, I want to discuss the rest of the configuration needed for our feature.
Based on their scope, features will auto-install (and possibly auto-activate) by default. Site collection features (like our deployment script) are fine with the default values. But if we're going after a web application-scoped feature, (like we'll need to do when we talk about search deployments later) these guys like to auto-activate. So review your requirements, and determine the behavior that works for you.
To take a look at this in more detail, let's revisit the Structure.Template.XML file. Notice that all we have here is the root "Feature" node. We already set the "ActivateOnDefault" setting. If we need to control the rest of the auto-provisioning settings, add the following attributes, and set their Boolean values accordingly:
| Attribute | True Value Description | False Value Description |
|---|---|---|
|
AlwaysForceInstall |
The feature will be explicitly installed, even if it already is. |
The feature will be automatically installed based on other settings; it won't perform the installation if the feature is already installed. |
|
AutoActivateInCentralAdmin |
This activates the feature upon deployment and a successful installation only on the Central Administration web application (or site collection or web; not farm). For other web apps or site collections or webs, behavior is dictated by other settings. |
The feature behaves according to other settings; the Central Administration web application has no special treatment. |
|
ActivateOnDefault |
The feature is activated upon a successful installation. |
The feature is not activated upon a successful installation. |
Feature Activation Properties
Some settings in the Visual Studio project's property page can influence these attributes (although the XML won't change). Right click the project, select "Properties" and then go into the "SharePoint" tab. If you need to explicitly activate any of your features in a particular order, change the "Activation Deployment Configuration" dropdown from its "Default" value to "No Activation." Then when you right-click-deploy your solution, only the installation will be performed.
Note: these settings apply to all
features in the solution.

You can even double click one of
the configuration items in the "Edit Configurations" list box to explicitly
dictate what each one does in terms of the deployment steps. Use these to
control your right-click-deploys while in development to make the process as
efficient as possible for your needs; jump into the XML only to control the
activations more explicitly on a feature-by-feature basis.

The rest of the attributes will be set automatically by Visual Studio at deployment time: ReceiverAssembly, ReveiverClass, Title, Scope, etc.; we don't need to worry about them. At most, we'll only need to specify three Boolean XML attributes in an entire All Code deployment: not bad. Despite all the wonderfulness All Code deployments gives us, at least Visual Studio provides XSD-based IntelliSense support in these XML files. So when we need to jump behind the scenes of the designers, but not all the way down to the code, the experience will be less painful than it's been in the past.
A Note on Feature Ids
In the Structure.Template.XML file
mentioned above, where we can hand-roll custom XML, we only see the skeleton of
the full markup; the rest is filled in dynamically during Visual Studio
deployments. To see what the fully-baked XML will look like, double click the
Structure.Feature node in the Solution Explorer hierarchy to view the feature
designer, then click the "Manifest" tab.
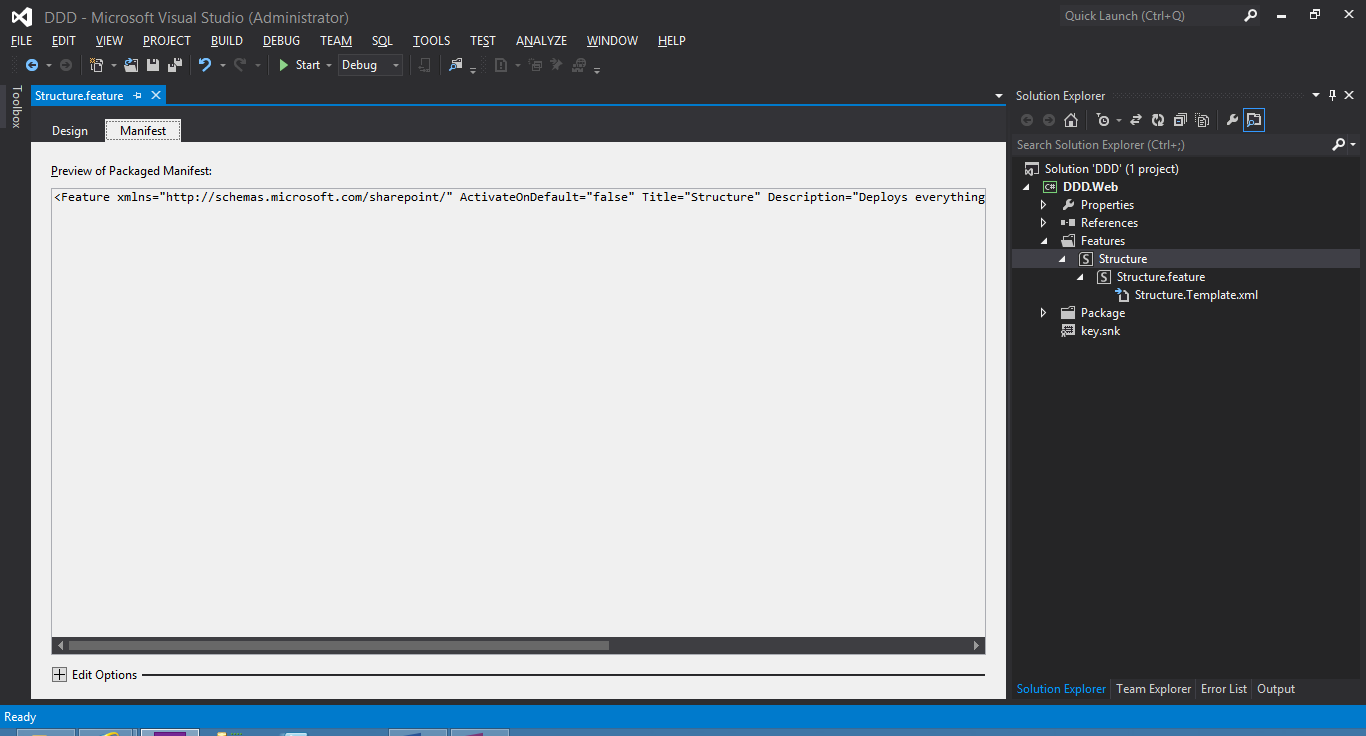
Clicking back to the "Design" tab
would simulate toggling between the ASP.NET designer and the backing HTML
file. But staying in the manifest, we can see all the attributes that will be
included in our feature.xml file that will be deployed to 15. Note that there
is an "Id" attribute here, and, more importantly, that it is different
than the "Guid" attribute that decorates our feature receiver class.
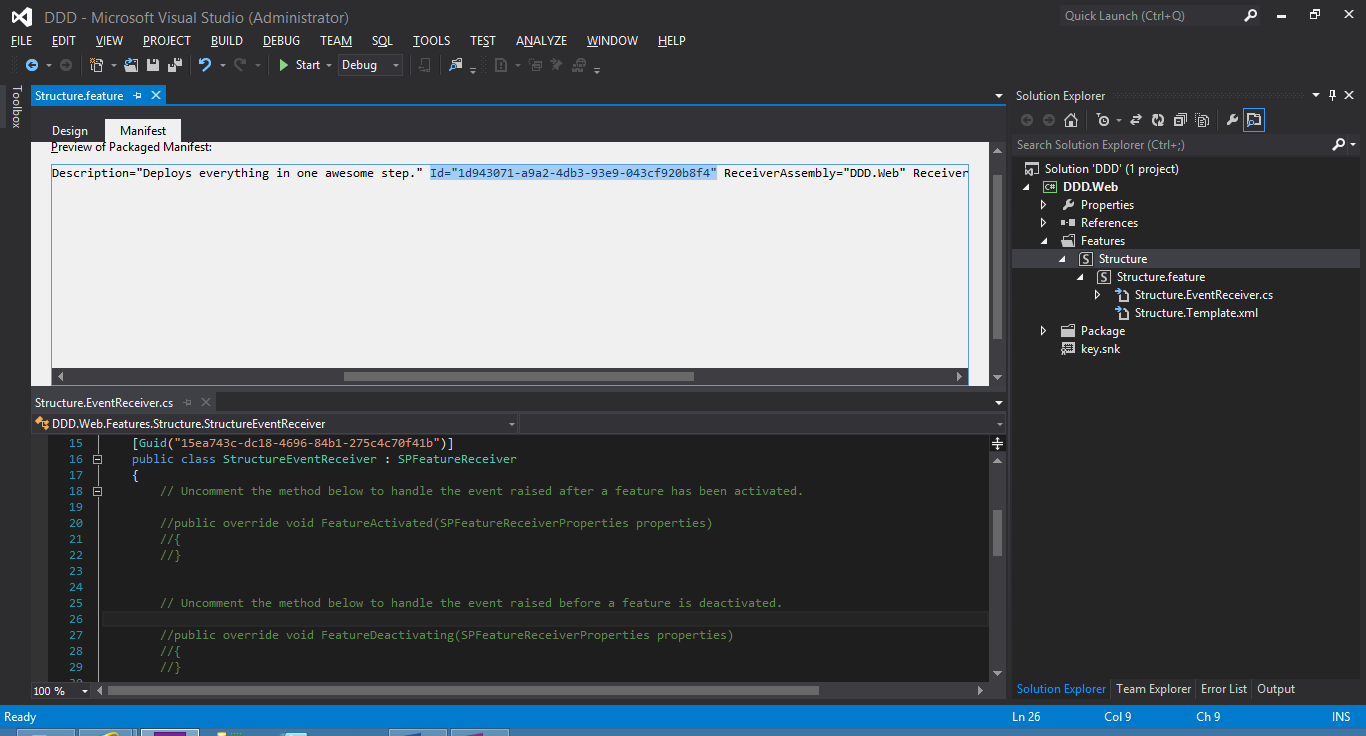
If we want to refer to a feature by Id (which is of course much safer than trying to match on a string title) then this is the one we want. I've never needed the Guid attribute value in the code file; it is used internally by the package designer to dynamically wire the receiver to the feature. Don't mess with it or remove it; just ignore it. When we need to reference our features by id in code or for scripting or to do anything else with it, use the ones in the feature designer (the top file in the image above).
